Drafts

Draft and unpublished posts

0 posts simple view

Last Thursday I learned about pytest-mock at a local python meetup. The presenter showed how he uses pytest-mock for his work, and it was kinda eye opening. I knew what mocking was, but I had not seen it in this context.

Discovery #

Watching him use pytest-mock I realized that mocking was not as hard as I had made it out to be. You can install pytest-mock, use the mocker fixture, and patch objects methods with what you want them to be.

install #

pytest-mock is out on pypi and can be installed with pip.

python -m pip install pytest-mock

What I actually did #

Sometimes I fall victim to making these posts nice and easy to follow. It takes more steps than just pip install, you need a place to practice in a nice sandbox. Here is how I make my sandboxes.

mkdir ~/git/learn-pytest-mock
cd ~/git/learn-pytest-mock
# well actually open a new tmux session there
echo pytest-mock > requirements.txt

# I copied in my .envrc, and ran direnv allow, which actually just made me a virtual env as follows
python3 -m venv .venv --prompt $(basename $PWD)
source .venv/bin/activate

# now install pytest-mock
pip install -r requirements.txt

# make some tests to mock
mkdir tests
nvim tests/test_me.py

create a tests/test_me.py #

I just wanted to do something that was worth mocking, the first thing that came to mind was to do something that made a network call. Here I made a method that uses requests to go get the content on my homepage, but changes it’s return behavior based on the status_code of the request.

I want to mock out requests to ensure that GoGetter can handle both 200 (http success) and 404 (http not found) status codes.

# tests/test_me.py
import requests


class GoGetter:
    """
    The thing I am testing, this is usually imported into the test file, but
    defined here for simplicity.
    """
    def get(self):
        """
        Get the content of `https://waylonwalker.com` and return it as a string
        if successfull, or False if it's not found.
        """
        r = requests.get("https://waylonwalker.com")
        if r.status_code == 200:
            return r.content
        if r.status_code == 404:
            return False


class DummyRequester:
    def __init__(self, content, status_code):
        """
        mock out content and status_code
        """

        self.content = content
        self.status_code = status_code

    def __call__(self, url):
        """
        The way I set this up GoGetter is going to call an instance of this
        class, so the easiest way to make it work was to implement __call__.
        """
        self.url = url
        return self


def test_success_get(mocker):
    """
    Show that the GoGetter can handle successful calls.
    """
    go_getter = GoGetter()

    # Use the mocker fixture to change how requests.get works while inside of test_success_get
    mocker.patch.object(requests, "get", DummyRequester("waylonwalker", 200))
    assert "waylon" in go_getter.get()


def test_failed_get(mocker):
    """
    Show that the GoGetter can handle failed calls.
    """
    go_getter = GoGetter()

    # Use the mocker fixture to change how requests.get works while inside of test_failed_get
    mocker.patch.object(requests, "get", DummyRequester("waylonwalker", 404))
    assert go_getter.get() is False

Python 3.8 came out two and a half years ago and I have yet to really lean in on the walrus operator. Partly because it always seemed like something kinda silly (my use cases) to require a python version bump for, and partly because I really didn’t understand it the best. Primarily I have wanted to use it in comprehensions, but I did not really understand how.

Now that Python 3.6 is end of life, and most folks are using at least 3.8 it seems time to learn and use it.

What’s a Walrus #

:=

The assignment operator in python is more commonly referred to as the walrus operator due to how := looks like a walrus. It allows you to assign and use a variable in a single expression.

This example from the docs avoids a second call to the len function.

if (n := len(a)) > 10:
    print(f"List is too long ({n} elements, expected <= 10)")

Let’s get some data #

without a walrus

In this example we are going to do a dict comp to generate a map of content from urls, only if their status code is 200. When doing this in a dictionary comprehension we end up needing to hit the url twice for successful urls. Once for the filter and once for the data going into the dictionary.

{
    url: requests.get(url).content
    for url in ["https://waylonwalker.com/", "https://waylonwalker.com/broken"]
    if requests.get(url).status_code == 200
}

Gimme some walrus #

using walrus in a dict comp

Using the walrus operator := list comp allows us to only put things into the dictionary that we want to keep, and not hit the url twice.

{
    url: r.content
    for url in ["https://waylonwalker.com/", "https://waylonwalker.com/broken"]
    if (r := requests.get(url)).status_code == 200
}

FIN #

The walrus is a nice to have option to save on extra function/network calls, and micro optimize your code without adding much extra.

Kedro rich is a very new and unstable (it’s good, just not ready) plugin for kedro to make the command line prettier.

Install kedro rich #

There is no pypi package yet, but it’s on github. You can pip install it with the git url.

pip install git+https://github.com/datajoely/kedro-rich

Kedro run #

You can run your pipeline just as you normally would, except you get progress bars and pretty prints.

kedro run
kedro rich pretty run

Kedro catalog #

Listing out catalog entries from the command line now print out a nice pretty table.

kedro catalog list
kedro rich catalog list table output

Give it a star #

Go to the GitHub repo and give it a star, Joel deserves it.

So worktrees, I always thought they were a big scary things. Turns out they are much simpler than I thought.

Myth #1 #

no special setup

I thought you had to be all in or worktrees or normal git, but not both. When I see folks go all in on worktrees they start with a bare repo, while its true this is the way you go all in, its not true that this is required.

Lets make a worktree #

Making a worktree is as easy as making a branch. It’s actually just a branch that lives in another place in your filesystem.

# checkout a new worktree called compare based on main in /tmp/project
git worktree add -b compare /tmp/project main

# checkout a new worktree called compare based on HEAD in /tmp/project
git worktree add -b compare /tmp/project

# checkout a worktree from an existing feature branch in /tmp/project
git worktree add /tmp/project my-existing-feature-branch

The worktree that you create is considered a linked worktree, while the original worktree is called the main worktree

Note that I put this in my tmp directory because I don’t expect it to live very long, my recent use case was to compare two files after a big formatting change. You put these where you want, but dont come at me when your /tmp gets wiped and you loose work.

Myth #2 #

they are hidden mysterious creatures

Just like branches git has some nice commands to help us understand what worktrees we have on our system. Firstly we have something very specific to worktrees to list them out.

git worktree list

gives the output

/home/u_walkews/git/git-work-play  b202442 [main]
/tmp/another                       d9b2cf1 [another]

Even the branch command gives a bit different output for a worktree.

git branch

gives this output, notice the + denotes an actively linked worktree, and the * gives the active branch. If you cd over to the worktree directory, these will switch roles.

+ another
  just-a-branch
* main

You can only checkout a branch in one place #

If you try to checkout a branch that is checked out in a linked worktree, you will be presented with an error, and it will not let you check out a second copy of that branch.

❯ git checkout another
fatal: 'another' is already checked out at '/tmp/another'

Myth #3 #

once you go worktree, you worktree

Once you have worktrees on your system, you have a few ways to get rid of them. Using git’s way feels much superior, but if your a doof like me and didn’t read the manual before you rm /tmp/another -rf you will notice that the worktree is still active. If you run git worktree prune it will clean that right up.

git worktree remove another

rm /tmp/another
git worktree prune

It won’t let you remove if you have changes #

This makes me think that remove is a much safer option. If you have uncommitted changes, git worktree remove will throw an error, and make you commit or use --force to remove the worktree.

❯ git worktree remove another
fatal: 'another' contains modified or untracked files, use --force to delete it

RTFM #

read the friendly manual

There is a ton more information in the man page for worktrees, these are just the parts that seemed really useful to me out of the gate.

man git worktree
Has no upstream branch errors in git can be such a damn productivity killer. You gotta stop your flow and swap over the branch, there is a config so that you don’t have to do this.

fatal has no upstream branch #

If you have not yet configured git to always push to the current branch, you will get a has no upstream branch error if you don’t explicitly set it.

Let’s show an example

git checkout -b feat/ingest-inventory-data
git add conf/base/catalog.yml
git commit -m "feat: ingest inventory data from abc-db"
git push

You will be presented with the following error.

fatal: The current branch feat/ingest-inventory-data has no upstream branch.
To push the current branch and set the remote as upstream, use

    git push --set-upstream origin feat/ingest-inventory-data

Option 1: follow the instructions #

To resolve this fatal error your first option is simply to follow the instructions given. Just copy and paste it in.

git push --set-upstream origin feat/ingest-inventory-data

Option 2: push to the current branch without setting upstream #

Honestly, I am pretty aware of the branch I am on, and Very few times have I ever accidentally pushed to the wrong branch. The one that you might have a bigger chance with a more detrimental effect is main, which I will argue you should have blocked to require a passing ci, and potential reviewers to merge in. Therefore you can’t even push to main anyway.

To just push to the branch you are currently on each and every time and never see this error again, you can run this to configure git to always push to your current branch.

git config --global push.default current

I write many of these posts from a 10 year old desktop that sits in my office these days. It does a very fine job running all of the things I need it to for my side work, but sometimes I want a mobile setup. I don’t really want to spend the $$ on a new laptop just for the few times I want to be somewhere else in the house. What I do have though is a chromebook.

I’ve tried to get the chromebook into my workflow in the past, but have failed. Much because by the time I got all of my tools up and running in the linux vm it was taking up quite a bit of space on the device and made it harder for others to use as a chromebook.

Today I am giving it a second try, but this time with ssh.

Checking for existing sshd #

Before doing anything I checked to see if sshd is already running. Using the following command.

sudo service ssh status
# or
pgrep -l sshd

Both returned nothing so I know that its not running.

setting up sshd #

just apt install it

Next install the openssh-client and openssh-server

sudo apt install openssh-client -y
sudo apt install openssh-server -y

After this I can see that its now running by checking its status once again.

sudo service ssh status

Gives me the result.

● ssh.service - OpenBSD Secure Shell server
     Loaded: loaded (/lib/systemd/system/ssh.service; enabled; vendor preset: enabled)
     Active: active (running) since Tue 2022-03-08 08:17:05 CST; 12min ago
       Docs: man:sshd(8)
             man:sshd_config(5)
    Process: 181185 ExecStartPre=/usr/sbin/sshd -t (code=exited, status=0/SUCCESS)
   Main PID: 181189 (sshd)
      Tasks: 1 (limit: 19119)
     Memory: 2.8M
        CPU: 96ms
     CGroup: /system.slice/ssh.service
             └─181189 sshd: /usr/sbin/sshd -D [listener] 0 of 10-100 startups

Accessing the desktop #

I have already enabled the Linux terminal on my chromebook, so I just opened the terminal, and ran the following.

ssh <username>@<ip-address>

It prompted for my password and I was in. I had all of my vim, tmux, and zsh comforts that I enjoy without installing anything. It worked so well that this whole post was written from my chromebook.

Limitations #

This does limit me to being on the same network as my desktop, which these days is almost always true.

ssh keys #

Out of the box I am just using passwords to get in, but if this were public I would lock down to requiring an ssh key to enter. I’ll likey do this in a future post.

Mermaid gives us a way to style nodes through the use of css, but rather than using normal css selectors we need to use style <nodeid>. This also applies to subgraphs, and we can use the name of the subgraph in place of the nodeid.

graph TD;
    a --> A
    A --> B
    B --> C

    style A fill:#f9f,stroke:#333,stroke-width:4px
    style B fill:#f9f,stroke:#333,stroke-width:4px

    subgraph one
        a
    end

    style one fill:#BADA55

produces the following graph

graph TD; a --> A A --> B B --> C style A fill:#f9f,stroke:#333,stroke-width:4px style B fill:#f9f,stroke:#333,stroke-width:4px subgraph one a end

style one fill:#BADA55

I recently found a really great plugin by mhinz to open files in neovim from a different tmux split, without touching neovim at all.

Installation #

neovim-remote is not a neovim plugin at all, it’s a python cli that you can install with pip. Unlike the repo suggests, I use pipx to install nvr.

pipx install neovim-remote

How I use it #

I have this added to my .envrc that is in every one of my projects. This will tie a neovim session to that directory, and all directories under it.

export NVIM_LISTEN_ADDRESS=/tmp/nvim-$(basename $PWD)

In my workflow I open a tmux session for each project, so this essentially ties a neovim session to a tmux session.

Open neovim #

First open neovim, but with the nvr command. This will open neovim, and look pretty much the same as always.

nvr

If you try to run nvr again in another shell nothing will happen as its already runnin under that address, but if you give it a filename it will open the file in the first instance of neovim that you opened.

nvr readme.md

Mermaid provides some really great ways to group or fence in parts of your graphs through the use of subgraphs.

Here we can model some sort of data ingest with some raw iot device and our warehouse in different groups.

graph TD;

    subgraph raw_iot
        a
    end

    subgraph warehouse
        A --> B
        B --> C
    end
graph TD;
subgraph raw_iot
    a
end

subgraph warehouse
    A --> B
    B --> C
end

connecting subgroups #

If we want to connect them, we can make a connection between a and A outside of the subgraphs.

graph TD;

    subgraph raw_iot
        a
    end

    a --> A

    subgraph warehouse
        A --> B
        B --> C
    end
graph TD;
subgraph raw_iot
    a
end

a --> A

subgraph warehouse
    A --> B
    B --> C
end

separation of concerns #

It’s also possible to specify subgraphs separate from where you define your nodes. which allows for some different levels of grouping that would not be possible if you were to define all your nodes inside of a subgraph.

graph TD;
    a --> A
    A --> B
    B --> C

    subgraph one
        A
        C
    end
graph TD; a --> A A --> B B --> C
subgraph warehouse
    A
    C
end

If you have ever ran which <command> and see duplicate entries it’s likely that you have duplicate entries in your $PATH. You can clean this up with a one liner at the end of your bashrc or zshrc.

eval "typeset -U path"

Since GitHub started supporting mermaid in their markdown I wanted to take another look at how to implement it on my site, I think it has some very nice opportunities in teaching, documenting, and explaining things.

The docs kinda just jumped right into their mermaid language and really went through that in a lot of depth, and skipped over how to implement it yourself, turns out its pretty simple. You just write mermaid syntax in a div with a class of mermaid on it!

<script src='https://unpkg.com/[email protected]/dist/mermaid.min.js'></script>
<div class='mermaid'>
graph TD;
a --> A
A --> B
B --> C
</div>

You just write mermaid syntax in a div with a class of mermaid on it!

The above gets me this diagram.

graph TD; a --> A A --> B B --> C

This feels so quick and easy to start getting some graphs up and running, but does lead to layout shift and extra bytes down the pipe. The best solution in my opionion would be to forgo the js and ship svg. That said, this is do dang convenient I will be using it for some things.

There is GNU coreutils command called mktemp that is super handy in shell scripts to make temporary landing spots for files so that they never clash with another instance, and will automatically get cleaned up when you restart, or whenever /tmp gets wiped. I’m not sure when that is, but I don’t expect it to be long.

Making temp directories #

Here are some examples of making temp directories in different places, my favorite is mktemp -dt mytemp-XXXXXX.

# makes a temporary directory in /tmp/ with the defaul template tmp.XXXXXXXXXX
mktemp

# makes a temporary directory in your current directory
mktemp --directory mytemp-XXXXXX
# shorter version
mktemp -d mytemp-XXXXXX

# same thing, but makes a file
mktemp mytemp-XXXXXX

# makes a temporary directory in your /tmp/ directory (or what ever you have configured as your TMPDIR)
mktemp --directory --tmpdir mytemp-XXXXXX
# shorter version
mktemp -dt mytemp-XXXXXX

# same thing, but makes a file
mktemp --tmpdir mytemp-XXXXXX
# shorter version
mktemp -t mytemp-XXXXXX

Use Case #

Here is a sample script that shows how to capture the tempdir as a variable and reuse it. Here is an example of curling my bootstrap file into a temp directory and running it from that directory.

local tmp=`mktemp -dt bootstrap-XXXXXX`
pushd $tmp
curl https://raw.githubusercontent.com/WaylonWalker/devtainer/main/bootstrap > bootstrap
bash bootstrap
popd

Templates #

You must have at least 3 trailing X’s that mktemp will replace with random characters. I played with it for a bit, it kinda allows for some trailing characters, and will not fill groups of X’s earlier in your template, only the last consecutive string.

My randomm samples I played with.

waylonwalker.com on  main [!?]  v3.9.7 (waylonwalker.com) took 2m24s
❯ mktemp myXtemp-XaXbXXXX -dt
/tmp/myXtemp-XaXbx9hn

waylonwalker.com on  main [!?]  v3.9.7 (waylonwalker.com)
❯ mktemp myXtemp-XaXbXXXXs -dt
/tmp/myXtemp-XaXb2tpGs

waylonwalker.com on  main [!?]  v3.9.7 (waylonwalker.com)
❯ mktemp myXtemp-XaXbXXcXXs -dt
mktemp: too few X's in template ‘myXtemp-XaXbXXcXXs’

waylonwalker.com on  main [!?]  v3.9.7 (waylonwalker.com)
❯ mktemp myXtemp-XaXbXXcXXs -dt

waylonwalker.com on  main [!?]  v3.9.7 (waylonwalker.com)
❯ mktemp myXtemp-XaXbXXXXt -dt
/tmp/myXtemp-XaXbe8PWt

waylonwalker.com on  main [!?]  v3.9.7 (waylonwalker.com)
❯ mktemp myXtemp-XXX-you-XXX -dt
/tmp/myXtemp-XXX-you-48l

waylonwalker.com on  main [!?]  v3.9.7 (waylonwalker.com)
❯ mktemp myXtemp-XXX-you-XX -dt
mktemp: too few X's in template ‘myXtemp-XXX-you-XX’

RTFM #

The man page has good stuff on all the flags that you might need.

man mktemp

Once you give a branch the big D (git branch -D mybranch) its gone, its lost from your history. It’s completely removed from your log. There will be no reference to these commits, or will there?

TLDR #

Checkout is your savior, all you need is the commit hash.

Immediate Regret #

your terminal is still open

We have all done this, you give branch the big D only to realize it was the wrong one. Don’t worry, not all is lost, this is the easiest to recover from. When you run the delete command you will see something like this.

❯ git branch -D new
Deleted branch new (was bc02a64).

Notice the hash is right there is the hash of your commit. You can use that to get your content back.

git checkout -b bc02a64
git branch new

# or in one swoop checkout your new branch at the `start-point` you want
git checkout -b new bc02a64

Delayed reaction #

you have closed your terminal

If you have closed your terminal, or have deleted with a gui or something that does not tell you the hash as you run it, don’t fret, all your work is still there (as long as you have commited). You just have to dig it out. The reflog contains a list of all git operations that have occurred on your git repo, and can be incredibly helpful with this.

Kinda Recent #

If your botched delete operation was recent just diving right into the reflog will show it.

❯ git reflog
03a3338 (main) HEAD@{0}: checkout: moving from new to main
bc02a64 (HEAD -> another, new) HEAD@{4}: commit: newfile
03a3338 (main) HEAD@{2}: checkout: moving from main to new

In this example, I checked out a branch called new, commited a new file, then switched back to main and deleted new.

Now That I have the commit hash I can use the same solution to get my branch back.

git checkout -b bc02a64
git branch new

# or in one swoop checkout your new branch at the `start-point` you want
git checkout -b new bc02a64

A lot has happened since then #

If a lot has happened since then, you are going to need to pull out some more tool to sift through that reflog, especially if its a big one. The first suggestion that I have is to pipe into grep and look for commit messages, or the name of the branch.

❯ git reflog | grep "moving from"
03a3338 HEAD@{1}: checkout: moving from main to branch/oops
03a3338 HEAD@{2}: checkout: moving from oops to main
03a3338 HEAD@{4}: checkout: moving from main to oops
03a3338 HEAD@{5}: checkout: moving from another to main
bc02a64 HEAD@{6}: checkout: moving from main to another
03a3338 HEAD@{7}: checkout: moving from another to main
bc02a64 HEAD@{8}: checkout: moving from new to another
bc02a64 HEAD@{9}: checkout: moving from bc02a64bbe5683d905e333e8dfcbbb91a5e77549 to new
bc02a64 HEAD@{10}: checkout: moving from main to bc02a64bbe56
03a3338 HEAD@{11}: checkout: moving from new to main
03a3338 HEAD@{13}: checkout: moving from main to new
03a3338 HEAD@{14}: checkout: moving from other to main
03a3338 HEAD@{18}: checkout: moving from main to other

git has a built in --grep flag, but I don’t think there is a way to filter by branch name, regardless it still is helpful.

❯ git reflog --grep new
bc02a64 (HEAD -> another, new) HEAD@{4}: commit: newfile

Maybe if you can remember a filename you can pass in -- <filename>.

git reflog -- readme.md

RTFM #

There are many other ways to slice up a git log, and reflog alike. check out man git log for some more flags.

It’s nearly impossible to completely loose a file if it is commited to git. It’s likely harder to fully remove the file than it is to recover it, but how do we go about recovering those precious files that we have lost.

Listing all the deleted files in all of git history can be done by combining git log with --diff-filter. The log gives you lots of options to show different bits of information about the commit that happened at that point. It’s even possible to get a completely clean list of files that are in your git history but have been deleted.

git log –diff-filter #

These various commands will show all files that were ever deleted on your current branch.

# This one includes the date, commit hash, and Author
git log --diff-filter D

# this one could be a git alias, but includes empty lines
git log --diff-filter D --pretty="format:" --name-only

# this one has the empty lines cleaned up
git log --diff-filter D --pretty="format:" --name-only | sed '/^$/d'

git diff-filter

git reflog –diff-filter #

The reflog can be super powerful in finding lost files here, as it only cares about git operations, not just the current branch. It will search accross all branches for deleted files and report them.

# This one includes the commit hash, branch, tag, and commit message
git reflog --diff-filter D

# You might want to at least add the filename
git reflog --diff-filter D --name-only

# this one could be a git alias, but includes empty lines
git reflog --diff-filter D --pretty="format:" --name-only

# this one has the empty lines cleaned up
git reflog --diff-filter D --pretty="format:" --name-only | sed '/^$/d'

get the last commit from a file #

git log -n 1 --pretty=format:%H -- file

If you want dont like how the output looks or you want your default pager to be different you can configure the default pager see Set Your Git Pager Config.

Git commands such as diff, log, whatchanged all take a flag called --diff-filter. This can filter for only certain types of diffs, such as added (A), modified (M), or deleted (D).

Man page #

You can find the full description by searching for --diff-filter in the man git diff page.

--diff-filter=[(A|C|D|M|R|T|U|X|B)...[*]]
    Select only files that are Added (A), Copied (C), Deleted (D), Modified (M), Renamed (R), have their type (i.e. regular file, symlink, submodule, ...)
    changed (T), are Unmerged (U), are Unknown (X), or have had their pairing Broken (B). Any combination of the filter characters (including none) can be used.
    When * (All-or-none) is added to the combination, all paths are selected if there is any file that matches other criteria in the comparison; if there is no
    file that matches other criteria, nothing is selected.

    Also, these upper-case letters can be downcased to exclude. E.g.  --diff-filter=ad excludes added and deleted paths.

    Note that not all diffs can feature all types. For instance, diffs from the index to the working tree can never have Added entries (because the set of paths
    included in the diff is limited by what is in the index). Similarly, copied and renamed entries cannot appear if detection for those types is disabled.

Try it out #

Open up a git repo and play around with this, here are some example that I played with that seemed useful to me.

# find when any files were deleted
git log --diff-filter D

# find when all files were added
git log --diff-filter A

# only one specific file
git log --diff-filter A -- readme.md

# partial match to a single file
git log --diff-filter A -- read*

# Find when all python files were added
git log --diff-filter A -- *.py

As I am toying around with textual, I am wanting some popup user input to take over. Textual is still pretty new and likely to change quite significantly, so I don’t want to overdo the work I put into it, So for now on my personal tuis I am going to shell out to tmux.

The Problem #

The main issue is that when you are in a textual app, it kinda owns the input. So if you try to run another python function that calls for input it just cant get there. There is a textual-inputs library that covers this, and it might work really well for some use cases, but many of my use cases have been for things that are pre-built like copier, and I am trying to throw something together quick.

textual is still very beta

Part of this comes down to the fact that textual is still very beta and likely to change a lot, so all of the work I have done with it is for quick and dirty, or fun side projects.

The Solution #

So the solution that was easiest for me… shell out to a tmux popup. The application I am working on wants to create new documents using copier templates. copier has a fantastic cli that walks throught he template variables and asks the user to fill them in, so I just shell out to that with Popen. Make sure that you wait for this process to finish otherwise there will be bit of jank in your textual app.

async def action_new_post(self) -> None:
    proc = subprocess.Popen(
        'tmux popup "copier copy plugins/todo-template tasks"', shell=True
    )
    proc.wait()

example #

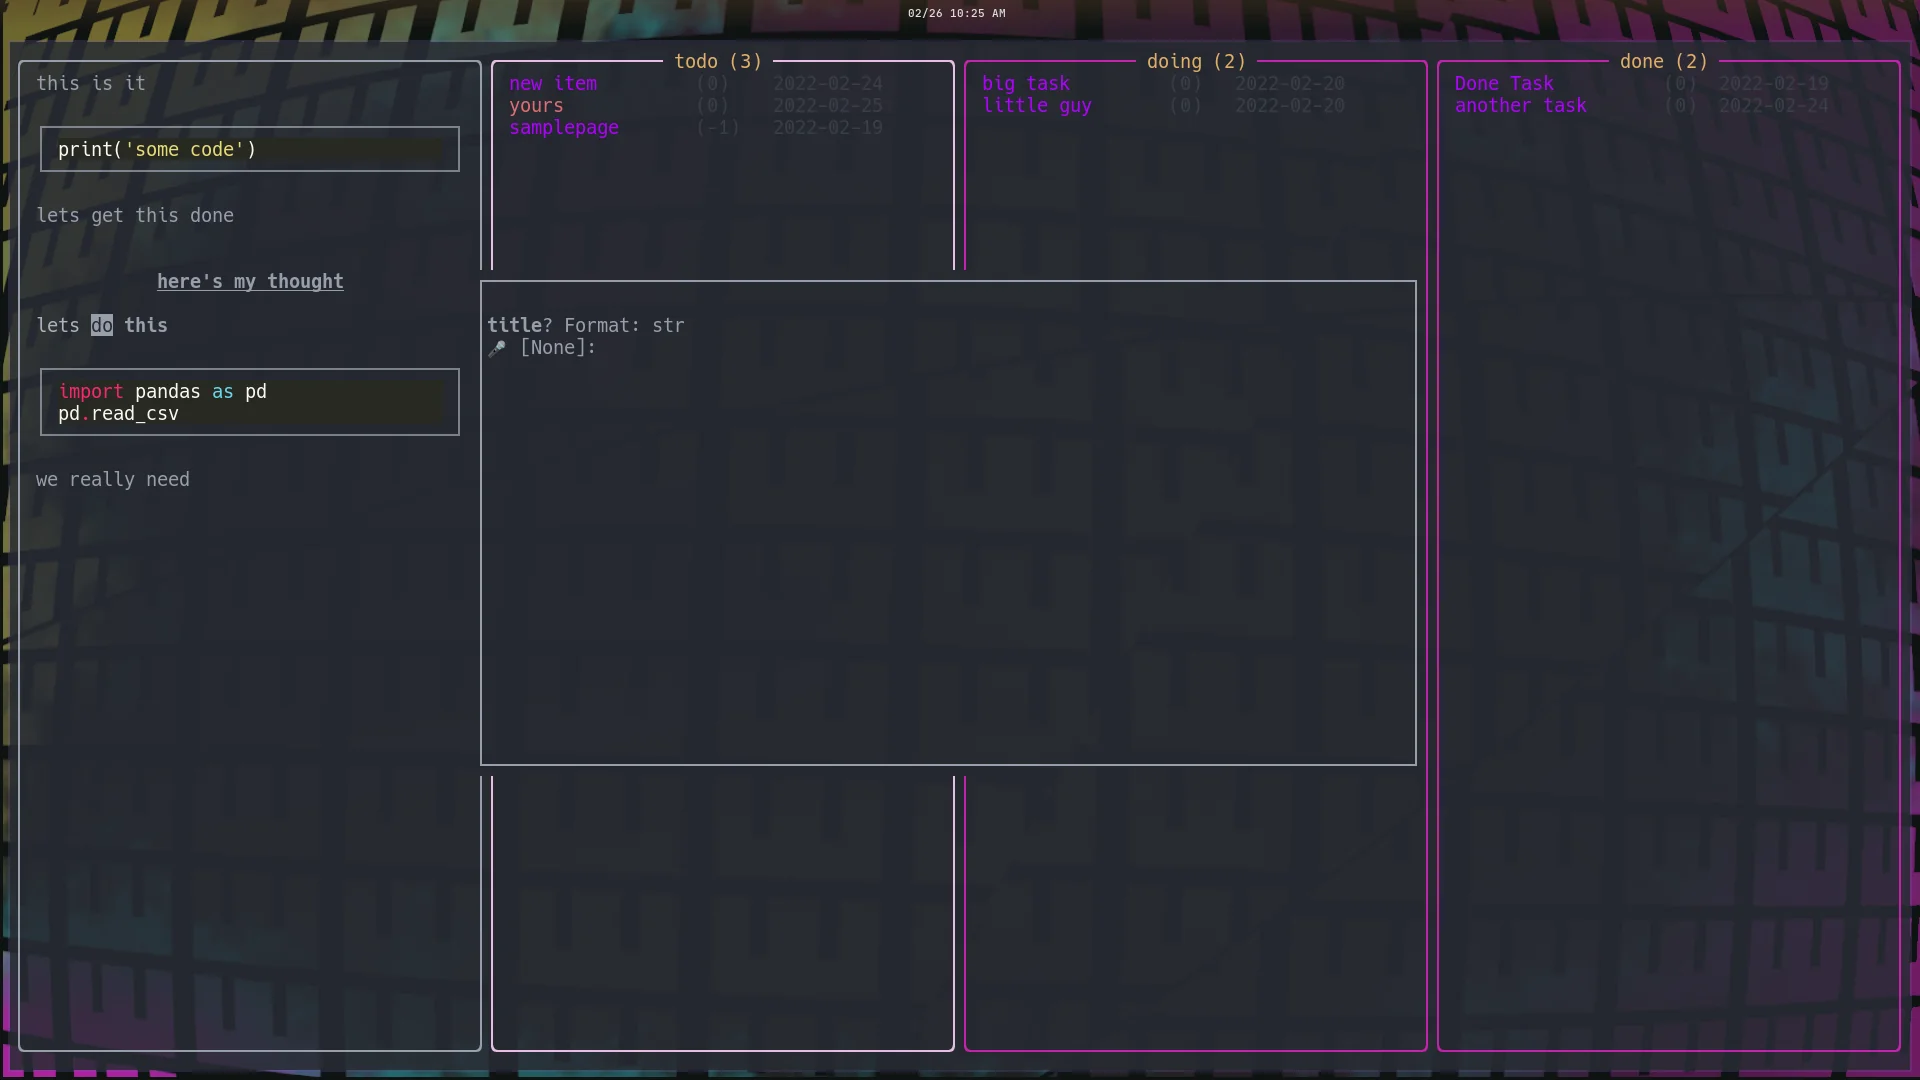
Here is what the running todo application looks like with the copier popup over it.

example of the popup running over textual

tmux popups

a bit more on tmux-popus [here] https://waylonwalker.com/tmux-popups/)

Big announcement recently that obs studio now builds out to a flatpak, hopefully making it easier for all of us to install, especially us near normies that don’t regularly compile anything from source.

install flatpak #

I did not have flatpak installed so the first thing I had to do was get the flatpak command installed, and add their default repo.

sudo apt install flatpak
flatpak remote-add --if-not-exists flathub https://flathub.org/repo/flathub.flatpakrepo

Once I had flatpak, I was able to get obs installed with the following command.

flatpak install flathub com.obsproject.Studio

Once Installed it fired right up for me with the next command they suggested.

flatpak run com.obsproject.Studio

It Works #

Pretty straightforward, following the instructions given it all worked for me, but it was missing a lot of the plugins that the current snap package I am using gives me (namely virtual webcam). So I am not ready to jump onto it until I figure out how to manage my own obs plugins. For now I think the snap is working just well enough.

Mermaid diagrams provide a way to display graphs defined as plain text. Some markdown renderers support this as a plugin. GitHub now supports it.

example #

You can define nodes like this in mermaid, and GitHub will now render them as a pretty graph diagram. Its rendered in svg, so its searchable with control f and everything.

graph TD;
      A-->B;
      A-->C;
      B-->D;
      C-->D-->OUT;
      E-->F-->G-->OUT
Here is what the example looks like on GitHub

Git has a built in way to rebase all the way back to the beginning of time. There is no need to scroll through the log to find the first hash, or find the total number of commits. Just use --root.

git rebase --root

Glances is a system monitor with a ton of features, including docker processes.

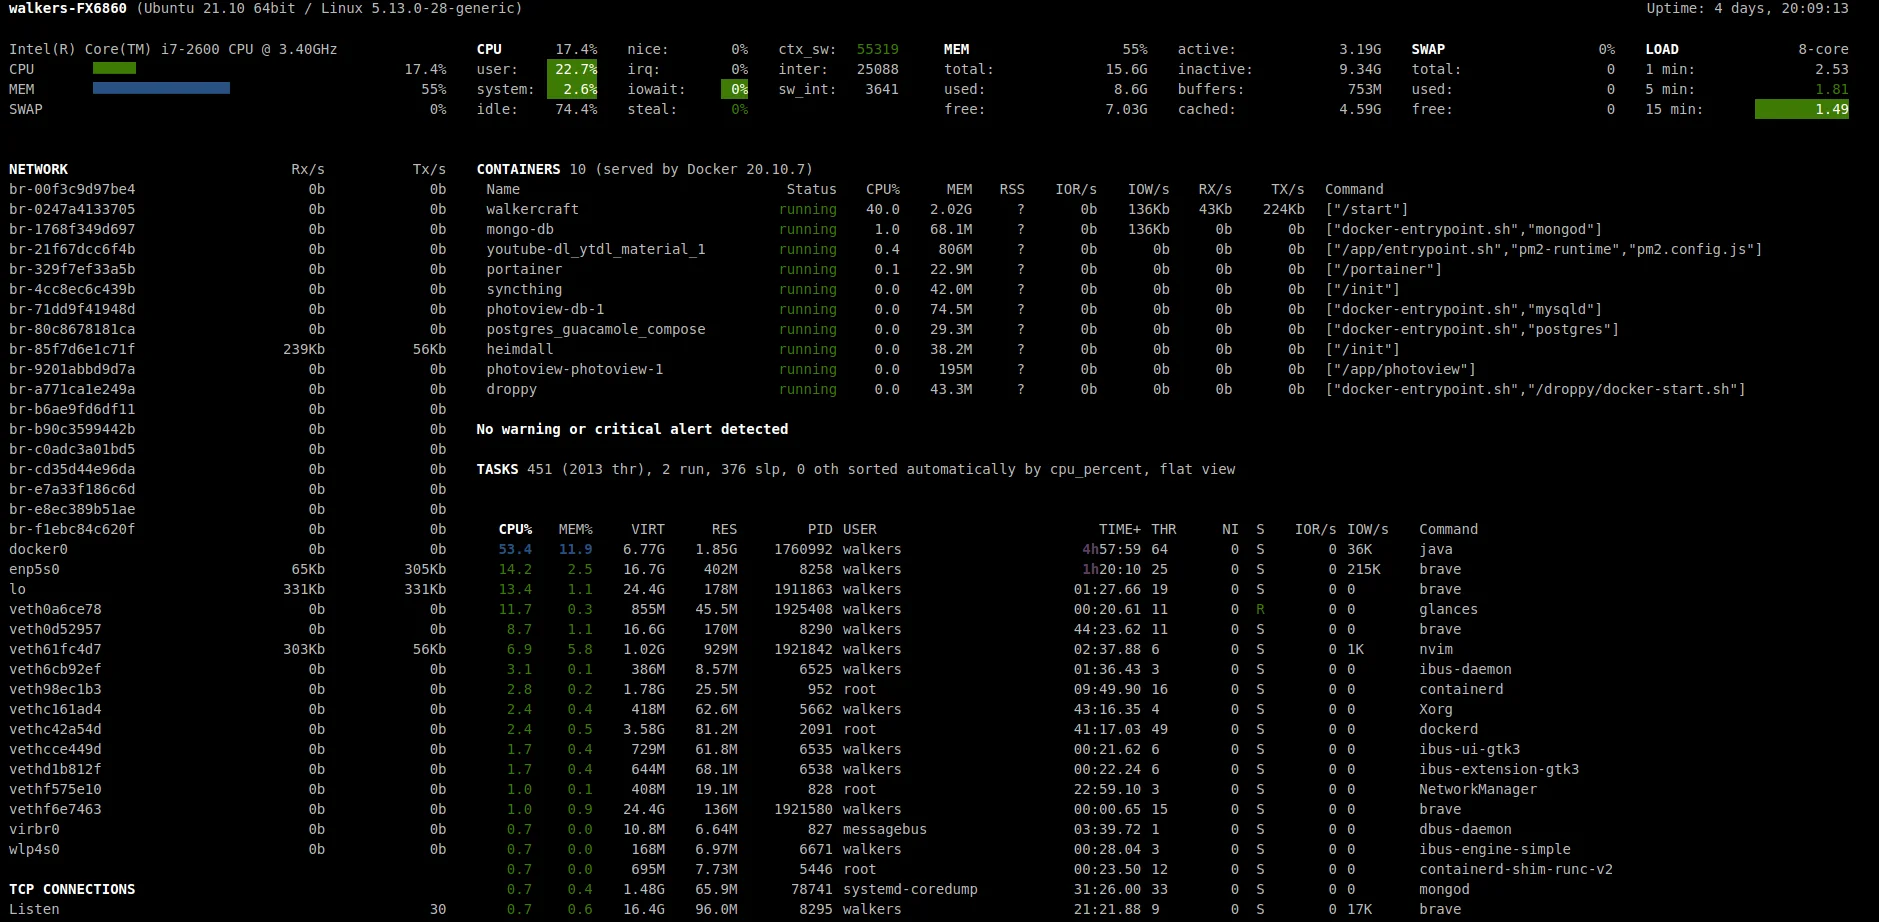
I have started using portainer to look at running docker processes, its a great heavy-weight docker process monitor. glances works as a great lightweight monitor to just give you the essentials, ( Name, Status, CPU%, MEM, /MAX, IOR/s, IOW/s, Rx/s, Tx/s, Command)

install #

You will need to install glances to use the glances webui. We can still use pipx to manage our virtual environment for us so that we do not need to do so manually or run the risk of globally installed package dependency hell.

pipx install glances
pipx inject glances "glances[docker]"

You will be presented with this success message.

  injected package glances into venv glances
done! ✨ 🌟 ✨

results #

Now running glances will also show information about your running docker containers.

running glances with docker installed will show your docker processes