Drafts

Draft and unpublished posts

0 posts simple view

Git reflog can perform some serious magic in reviving your hard work from the dead if you happen to loose it.

caveat #

You must git commit! If you never commit the file, git cannot help you. You might look into your trashcan, filesystem versions, onedrive, box, dropbox. If you have none of this, then you are probably hosed.

practice #

I really like to practice these techniques before I need to use them so that I understand how they work in a low stakes fashion. This helps me understand what I can and cannot do, and how to do it in a place that does not matter in any way at all.

This is what I did to revive a dropped docker-compose.yml file. The idea is that if I can find the commit hash, I can cherry-pick it.

git init
touch readme.md
git add readme.md
git commit -m "add readme"
touch docker-compose.yml
git add docker-compose.yml
git commit -m "add docker-compose"
git reset 3cfc --hard
git reflog
# copy the hash of the commit with my docker-compose commit
git cherry-pick fd74df3

reflog #

Here was the final reflog that shows all of my git actions. note I did reset twice.

❯ git reflog --name-only
0404b6a (HEAD -> main) HEAD@{0}: cherry-pick: add docker-compose
docker-compose.yml
3cfcab9 HEAD@{1}: reset: moving to 3cfc
readme.md
9175695 HEAD@{2}: cherry-pick: add docker-compose
docker-compose.yml
3cfcab9 HEAD@{3}: reset: moving to 3cfc
readme.md
fd74df3 HEAD@{4}: commit: add docker-compose
docker-compose.yml
3cfcab9 HEAD@{5}: reset: moving to HEAD
readme.md
3cfcab9 HEAD@{6}: commit (initial): add readme
readme.md

Glances has a pretty incredible webui to view system processes and information like htop, or task manager for windows.

The nice thing about the webui is that it can be accessed from a remote system. This would be super nice on something like a raspberry pi, or a vm running in the cloud. Its also less intimidating and easier to search if you are not a terminal junky.

install #

You will need to install glances to use the glances webui. We can still use pipx to manage our virtual environment for us so that we do not need to do so manually or run the risk of globally installed package dependency hell.

pipx install glances
pipx inject glances "glances[web]"

You will be presented with this success message.

  injected package glances into venv glances
done! ✨ 🌟 ✨

running the webui #

Now that you have glances installed you can run it with the -w flag to run the webui.

glances -w

This will present you with the following success message.

Glances Web User Interface started on http://0.0.0.0:61208/

Open it in your browser #

Now that its running you can open your web browser to localhost:61208 and be presented with the glances webui.

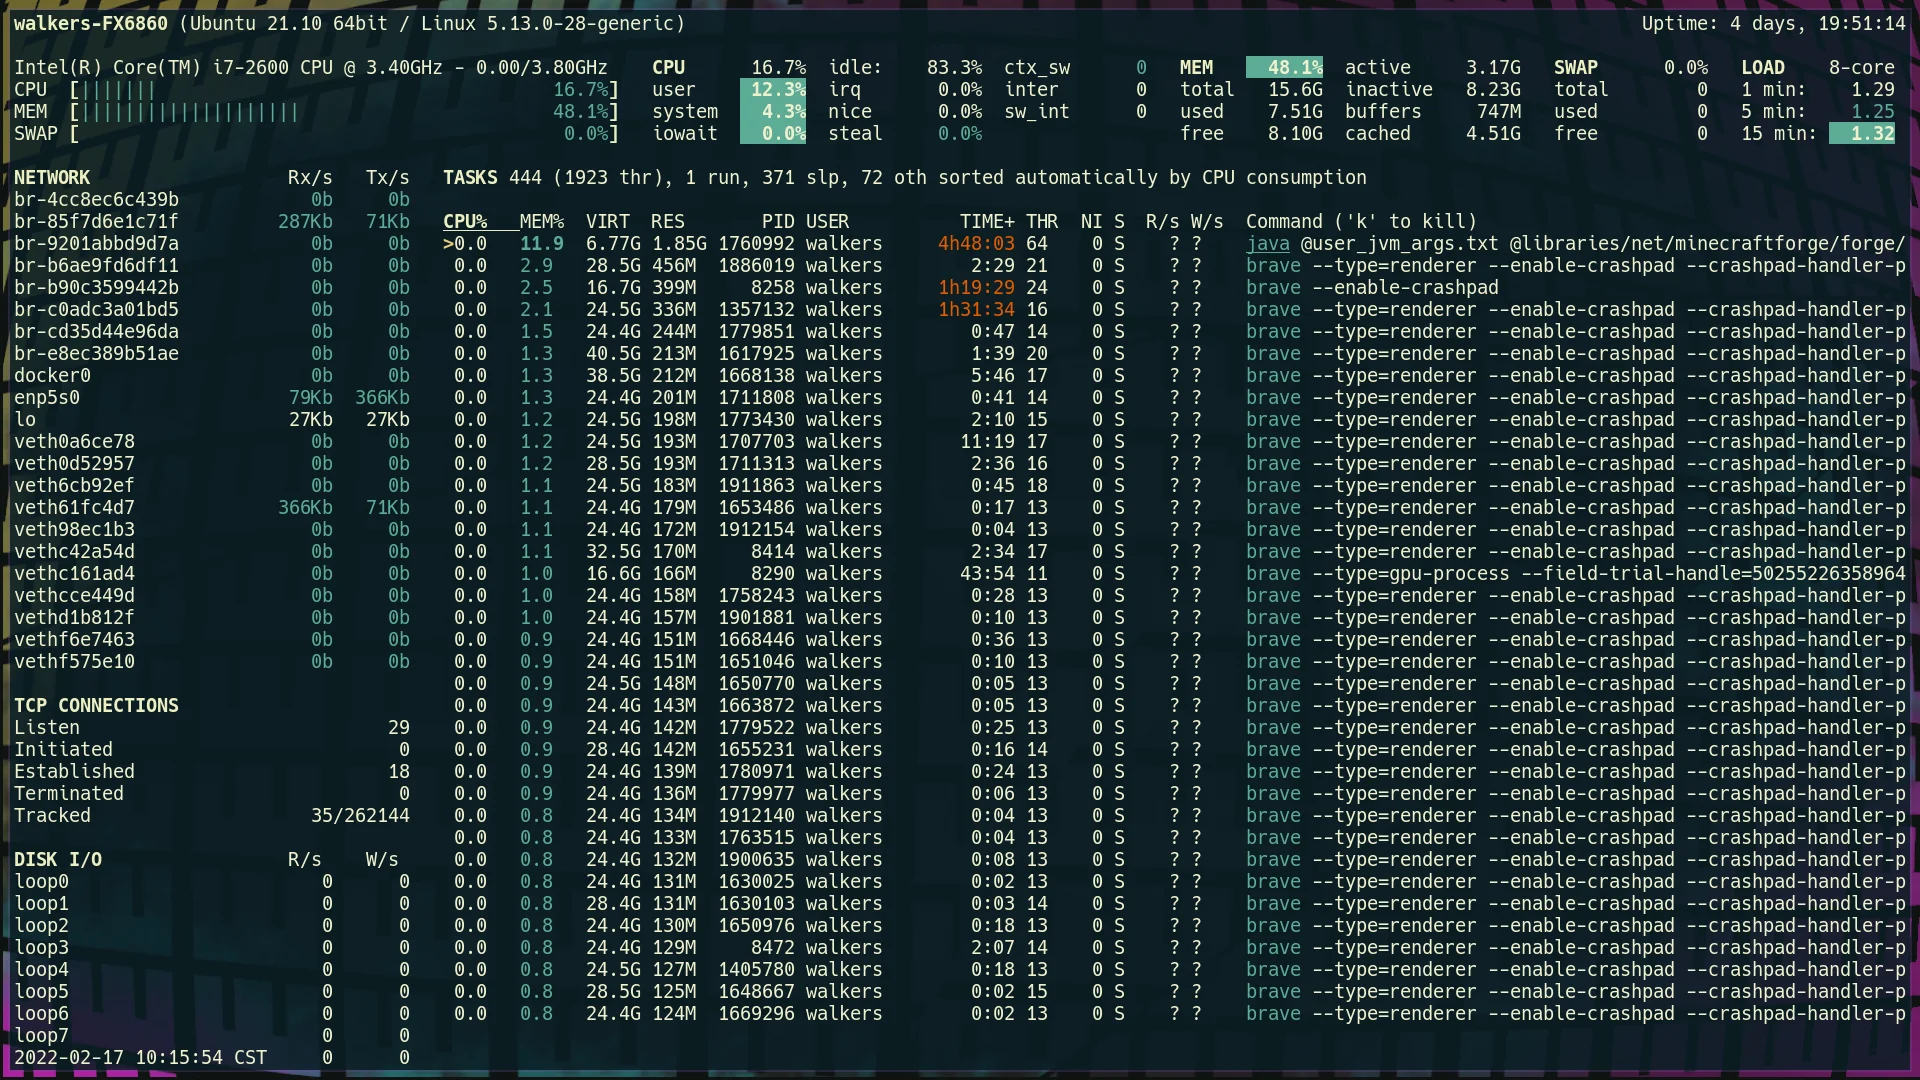
running the glances webui on my system

Right inside the git docs, is states that the git reflog command runs git reflog show by default which is an alias for git log -g --abbrev-commit --pretty=oneline

This epiphany deepens my understanding of git, and lets me understand that most git log flags might also work with git log -g.

full or short format #

Here are some git commands for you to try out on your own that are all pretty similar, but vary in how much information they show.

# These show only first line of the commit message subject, the hash, and index
git reflog
git log -g --abbrev-commit --pretty=oneline

# similar to git log, this is a fully featured log with author, date, and full
# commit message
git log -g

add files #

If I am looking for a missing file, I might want to leverage --name-only or --stat, to see where I might have hard reset that file, or deleted it.

git reflog --stat
git log -g --stat --abbrev-commit --pretty=oneline

git reflog --name-only
git log -g --name-only --abbrev-commit --pretty=oneline

example #

Here is an example where I lost my docker-compose.yml file in a git reset, and got it back by finding the commit hash with git reflog and cherry picked it back.

❯ git reflog --name-only
0404b6a (HEAD -> main) HEAD@{0}: cherry-pick: add docker-compose
docker-compose.yml
3cfcab9 HEAD@{1}: reset: moving to 3cfc
readme.md
9175695 HEAD@{2}: cherry-pick: add docker-compose
docker-compose.yml
3cfcab9 HEAD@{3}: reset: moving to 3cfc
readme.md
fd74df3 HEAD@{4}: commit: add docker-compose
docker-compose.yml
3cfcab9 HEAD@{5}: reset: moving to HEAD
readme.md
3cfcab9 HEAD@{6}: commit (initial): add readme
readme.md

This just proves that its harder to remove something from git, than it is to get it back. It can feel impossible to get something back, but once its in, it feels even more impossible to get it out.

Glances is a fully featured system monitoring tool written in python. Out of the box it’s quite similar to htop, but has quite a few more features, and can be ran without installing anything other than pipx, which you should already have installed if you do anything with python.

pipx run glances

Once you run this you will be in a tui application similar to htop. You can kill processes with k, use left and right arrows to change the sorting column, and up and down to select different processes.

running pipx run glances on my ubuntu 21.10 machine inside the kitty terminal

python requirements text files can in fact depend on each other due to the fact that you can pass pip install arguments right into your requirements.txt file. The trick is to just prefix the file with a -r flag, just like you would if you were installing it with pip install

try it out #

Lets create two requirements files in a new directory to play with.

mkdir requirements-nest
cd requirements-nest
touch requirements.txt requirements_dev.txt

Then add the following to each requirements file.

# requirements.txt
kedro[pandas.ParquetDataSet]
# requirements_dev.txt
-r requirements.txt
ipython

Installing #

Installing requirements_dev.txt will install both ipython and pandas since it includes the base requirements file.

# this will install only pandas
pip install -r requirements.txt

# this will install both ipython and pandas
pip install -r requirements_dev.txt

This is covered in the pip user guide, but it is not obvious that this can be done in a requirements.txt file.

In my adventure to put more homelab in docker, I moved our modded minecraft setup to docker.

Getting Mods #

So far I have found all of our mods from curse forge. modpacks make getting multiple mods working together much easier, someone else has already vetted a pack of often times 100+ mods that all play well together. I have yet to get these working in docker, I will, but for not I just have individual mods.

download file #

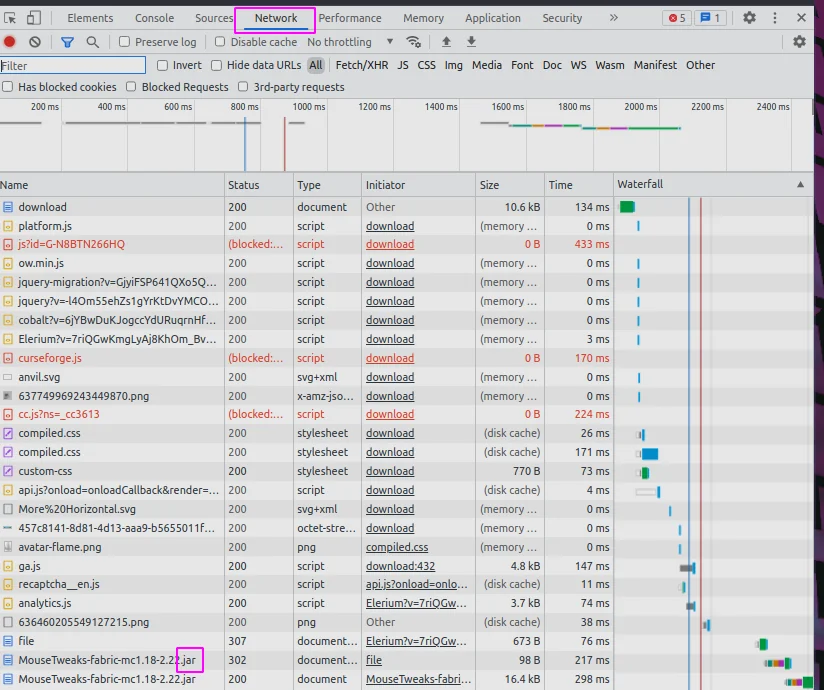
under the hood docker is using wget to get the mod. The link you click on from curseforge will block wget. What I do is pop open the devtools (f12 in chrome), click on the network tab, click the download link on the web page, and watch the real link show up.

minecraft mod in netwrok tab

Docker-compose #

I am using docker compose, it makes the command much easier to start, and all the things needed stored in a file. I am not using compose to run multiple things, just for the simple start command.

Create a directory for your server and add the following to a docker-compose.yml file.

version: "3.8"

services:
  mc:
    container_name: walkercraft
    image: itzg/minecraft-server
    ports:
      - 25565:25565
    environment:
      EULA: "TRUE"
      TYPE: "FORGE"
      VERSION: 1.16.5
      MODS_FILE: /extras/mods.txt
      REMOVE_OLD_MODS: "true"
    tty: true
    stdin_open: true
    restart: unless-stopped
    ports:
      - 25565:25565
    volumes:
      - ./minecraft-data:/data
      - ./mods.txt:/extras/mods.txt:ro

volumes:
  data:

mods.txt #

Once you have your mod file link from the network tab add them to a mods.txt file next to your docker-compose file.

https://media.forgecdn.net/files/3620/189/engineersdecor-1.16.5-1.1.16.jar

start your server #

Once you have made it this far starting the server is pretty simple.

docker compose up -d

kill your server #

If your still in the same directory, taking down the server should be pretty easy as well.

docker compose down

# if that does not work you can kill it
docker ps
# copy the id of your container
docker kill <id>

Reading eventbridge rules from the command line can be a total drag, pipe it into visidata to make it a breeze.

I just love when I start thinking through how to parse a bunch of json at the command line, maybe building out my own custom cli, then the solution is as simple as piping it into visidata. Which is a fantastic tui application that had a ton of vim-like keybindings and data features.

alias awsevents = aws events list-rules | visidata -f json

Anyone just starting out their vim customization journey is bound to run into this error.

E5520: <Cmd> mapping must end with <CR>

I did not get it #

I’ll admit, in hindsight it’s very clear what this is trying to tell me, but for whatever reason I still did not understand it and I just used a : everywhere.

From the docs #

If you run :h <cmd> you will see a lot of reasons why you should do it, from performance, to hygene, to ergonomics. You will also see another clear statement about how to use <cmd>.

                                                          E5520
  <Cmd> commands must terminate, that is, they must be followed by <CR> in the
  {rhs} of the mapping definition.  Command-line mode is never entered.

When to map with a : #

You still need to map your remaps with a : if you do not close it with a <cr>. This might be something like prefilling a command with a search term.

nnoremap <leader><leader>f :s/search/

Otherwise use #

If you can close the <cmd> with a <cr> the command do so. Your map will automatically be silent, more ergonomic, performant, and all that good stuff.

nnoremap <leader><leader>f <cmd>s/search/Search/g<cr>

Hydroneer

Steam achievements and progress for Hydroneer - 0.0% complete with 0/78 achievements unlocked.

6 min

The default keybinding for copy-mode <prefix>-[ is one that is just so awkward for me to hit that I end up not using it at all. I was on a call with my buddy Nic this week and saw him just fluidly jump into copy-mode in an effortless fashion, so I had to ask him for his keybinding and it just made sense. Enter, that’s it. So I have addedt his to my ~/.tmux.conf along with one for alt-enter and have found myself using it way more so far.

Setting copy-mode to enter #

To do this I just popped open my ~/.tmux.conf and added the following. Now I can get to copy-mode with <prefix>-Enter which is control-b Enter, or alt-enter.

bind Enter copy-mode
bind -n M-Enter copy-mode

More on copy-mode #

I have a full video on copy-mode you can find here.

tmux copy-mode

In python, a string is a string until you add special characters.

In browsing twitter this morning I came accross this tweet, that showed that you can use is accross two strings if they do not contain special characters.

https://twitter.com/bascodes/status/1492147596688871424

I popped open ipython to play with this. I could confirm on 3.9.7, short strings that I typed in worked as expected.

waylonwalker main v3.9.7 ipython
 a = "asdf"

waylonwalker main v3.9.7 ipython
 b = "asdf"

waylonwalker main v3.9.7 ipython
 a is b
True

Using the upper() method on these strings does break down.

waylonwalker main v3.9.7 ipython
 a.upper() is b.upper()
False

waylonwalker main v3.9.7 ipython
 a = "ASDF"

waylonwalker main v3.9.7 ipython
 b = "ASDF"

waylonwalker main v3.9.7 ipython
 a is b
True

If You can also see this in the id of the objects as well, which is the memmory address in CPython.

waylonwalker main v3.9.7 ipython
 id(a)
140717359289568

waylonwalker main v3.9.7 ipython
 id(b)
140717359289568

waylonwalker main v3.9.7 ipython
 id(a.upper())
140717359581824

waylonwalker main v3.9.7 ipython
 id(b.upper())
140717360337824

Finally just as the post shows if you add a special character in there it also breaks.

waylonwalker main v3.9.7 ipython
 a = "ASDF!"

waylonwalker main v3.9.7 ipython
 b = "ASDF!"

waylonwalker main v3.9.7 ipython
 a is b
False

What should you do #

First and foremost, these are the exact pitfalls that flake8 guards you against. So the very first things you should take away here is that there is a lot of wisdom and value in flake8.

Second, the is comparison should be used for things that you want to compare to exact memmory addresses. These include booleans and None. Don’t use is accross two assigned variables.

One thing about moving to a tiling window manager like awesome wm or i3 is that they are so lightweight they are all missing things like bluetooth gui’s out of the box, and you generally bring your own. Today I just needed to connet a new set of headphones, so I decided to just give the bluetoothctl cli a try. It seems to come with Ubuntu, I don’t think I did anything to get it.

bluetoothctl

Running bluetoothctl pops you into a repl/shell like bah, python, or ipython. From here you can execute bluetoothctl commands.

Here is what I had to do to connect my headphones.

# list out the commands available
help

# scan for new devices and stop when you see your device show up
scan on
scan off

# list devices
devices
paired-devices

# pair the device
pair XX:XX:XX:XX:XX:XX

# now your device should show up in the paired list
paired-devices

# connet the device
connect XX:XX:XX:XX:XX:XX

help #

Here is the output of the help menu on my machine, it seems pretty straight forward to block, and remove devices from here.

note ctrl revers to the bluetooth controller on the machine you are on, and dev refers to a device id.

Menu main:
Available commands:
-------------------
advertise                                         Advertise Options Submenu
scan                                              Scan Options Submenu
gatt                                              Generic Attribute Submenu
list                                              List available controllers
show [ctrl]                                       Controller information
select <ctrl>                                     Select default controller
devices                                           List available devices
paired-devices                                    List paired devices
system-alias <name>                               Set controller alias
reset-alias                                       Reset controller alias
power <on/off>                                    Set controller power
pairable <on/off>                                 Set controller pairable mode
discoverable <on/off>                             Set controller discoverable mode
agent <on/off/capability>                         Enable/disable agent with given capability
default-agent                                     Set agent as the default one
advertise <on/off/type>                           Enable/disable advertising with given type
set-alias <alias>                                 Set device alias
scan <on/off>                                     Scan for devices
info [dev]                                        Device information
pair [dev]                                        Pair with device
trust [dev]                                       Trust device
untrust [dev]                                     Untrust device
block [dev]                                       Block device
unblock [dev]                                     Unblock device
remove <dev>                                      Remove device
connect <dev>                                     Connect device
disconnect [dev]                                  Disconnect device
menu <name>                                       Select submenu
version                                           Display version
quit                                              Quit program
exit                                              Quit program
help                                              Display help about this program

Final Impressions #

This was something that I have never used, and thought it would be intimidating but it worked great first try out of the box. It could have been my device on the other end, but this was one of the least frustrations I have had pairing a new device.

I often run shell commands from python with Popen, but not often enough do I set up error handline for these subprocesses. It’s not too hard, but it can be a bit awkward if you don’t do it enough.

Using Popen #

import subprocess
from subprocess import Popen

# this will run the shell command `cat me` and capture stdout and stderr
proc = Popen(["cat", "me"], stdout=subprocess.PIPE, stderr=subprocess.PIPE)

# this will wait for the process to finish.
proc.wait()

reading from stderr #

To get the stderr we must get it from the proc, read it, and decode the bystring. Note that we can only get the stderr object once, so if you want to do more than just read it you will need to store a copy of it.

proc.stderr.read().decode()

Better Exception #

Now that we can read the stderr we can make better error tracking for the user so they can see what to do to resolve the issue rather than blindly failing.

err_message = proc.stderr.read().decode()
if proc.returncode != 0:
    # the process was not successful

    if "No such file" in err_message:
        raise FileNotFoundError('No such file "me"')

Samba is an implementation of the smb protocol that allows me to setup network shares on my linux machine that I can open on a variety of devices.

I think the homelab is starting to intrigue me enought to dive into the path of experimenting with different things that I might want setup in my own home. One key piece of this is network storage. As I looked into nas, I realized that it takes a dedicated machine, or one virtualized at a lower level than I have capability for right now.

Humble Beginnings #

To get goind I am going to make a directory /srv/samba/public open to anyone on my network. I am not going to worry too much about it, I just want something up and running so that I can learn.

Install samba, open the firewall, and edit the smb.conf

sudo apt install samba samba-common-bin
sudo ufw allow samba
sudo nvim /etc/samba/smb.conf

I added this to the end of my smb.conf

[public]

comment = public share, no need to enter username and password
path = /srv/samba/public/
browseable = yes
writable = yes
guest ok = yes

Then I made the /srv/samba/public directory and made it writable by anyone.

sudo mkdir -p /srv/samba/public
sudo setfacl -R -m "u:nobody:rwx" /srv/samba/public/

Windows, yes windows #

I have a windows desktop in my office, primarily for my wife to run premiere pro, and my son to play Minecraft. I walked over to it, opened the file explorer, and ernt to \\<my-local-ip>. It asked for the username and password, I typed in the username and password of the linux device I have the share running on, and I was in. Right there I could see the Public folder. I opened it and made a files successfully.

A super useful tool when doing PR’s or checking your own work during a big refactor is the silver searcher. Its a super fast command line based searching tool. You just run ag "<search term>" to search for your search term. This will list out every line of every file in any directory under your current working directory that contains a match.

Ahead/Behind #

It’s often useful to need some extra context around the change. I recently reviewed a bunch of PR’s that moved schema from save_args to the root of the dataset in all yaml configs. To ensure they all made it to the top level DataSet configuraion, and not underneath save_args. I can do a search for all the schemas, and ensure that none of them are under save_args anymore.

ag "schema: " -A 12 -B 12

I’ve ran a Minecraft server at home since December 2017 for me and my son to play on. We start a brand new one somewhere between every day and every week. The older he gets the longer the server lasts.

In all these years, I’ve been popping open the command line and running the server manually, and even inside of Digital Ocean occasionally to play a more public server with a friend.

My buddy Nic has been sharing me some of his homelab setup, and it’s really got me to thinking about what I can run at home, and Dockerizing all the things. Today I found a really sweet github repo that had a minecraft server running in docker with a pretty incredible setup.

I ended up running the first thing in the Readme that included a volume mount. If you are going to run this container, I HIGHLY reccomend that you make sure that you have your world volume mounted, otherwise it will die with your docker container.

Docker Compose #

With the following stored as my docker-compose.yml in a brand new and otherwise empty directory I was ready to start the server for the night.

version: "3"

services:
  mc:
    container_name: walkercraft
    image: itzg/minecraft-server
    ports:
      - 25565:25565
    environment:
      EULA: "TRUE"
    tty: true
    stdin_open: true
    restart: unless-stopped
    volumes:
      # attach a directory relative to the directory containing this compose file
      - ./minecraft-data:/data

To start the server we open up the terminal in this directory and run the follwing command.

docker compose up -d

Once its up and running we can run commands on the server simply by attaching to it.

docker attach walkercraft

A few common commands we run in the server #

We play very casually most of the time so we will set keepInventory to true so that we do not loose our inventory when we die. Sometimes we also op ourselve so that we can toggle gamemode into creative.

# set the game to keep your inventory when you die.
/gamrule keepInventory true

# give everyone operater priveledges to they can run commands
/op @a

# give playername op
/op playername

Installing rust in your own ansible playbook will make sure that you can get consistent installs accross all the machines you may use, or replicate your development machine if it ever goes down.

Personal philosophy #

I try to install everything that I will want to use for more than just a trial inside of my ansible playbook. This way I always get the same setup across my work and home machines, and anytime I might setup a throw away vm.

reccommended install #

This is how rust reccomends that you install it on Ubuntu. First update your system, then run their installer, and finally check that the install was successful.

# system update
sudo apt update
sudo apt upgrade

# download and run the rust installer
curl https://sh.rustup.rs -sSf | sh

# confirm your installation is successful
rustc --version

Ansible Install #

The first thing I do in my playbooks is to check if the tool is already installed. Here I chose to look for cargo, you could also look for rustc.

  - name: check if cargo is installed
    shell: command -v cargo
    register: cargo_exists
    ignore_errors: yes

I first check for an existing install so I can re-run my playbooks quickly filling in only missing tools. More on this ansible install conditionally

Next we need to download the installer script and make it executable.

  - name: Download Installer
    when: cargo_exists is failed
    get_url:
      url: https://sh.rustup.rs
      dest: /tmp/sh.rustup.rs
      mode: '0755'
      force: 'yes'
    tags:
      - rust

I chose to download the installer, because I was unable to pass in the -y flag otherwise, which is required to do unattended installs.

Last we just run the installer given to us by rust with the -y flag so that it will run unattended.


  - name: install rust/cargo
    when: cargo_exists is failed
    shell: /tmp/sh.rustup.rs -y
    tags:
      - rust

One more thing #

Make sure that you source your cargo env, otherwise your shell will not find rustc or cargo. I chose to do this by adding the following line to my ~/.zshrc. You can but it in ~/.bashrc if that is your thing, or just run it in your shell to just get it to work.

[ -f ~/.cargo/env ] && source $HOME/.cargo/env

Full Install Playbook #

Here is a fully working install playbook to get you started or to port into your own playbook.

- hosts: localhost
  gather_facts: true
  become: true
  become_user: "{{ lookup('env', 'USER') }}"

  pre_tasks:
    - name: update repositories
      apt: update_cache=yes
      become_user: root
      changed_when: False
  vars:
    user: "{{ ansible_user_id }}"
  tasks:
  - name: check if cargo is installed
    shell: command -v cargo
    register: cargo_exists
    ignore_errors: yes

  - name: Download Installer
    when: cargo_exists is failed
    get_url:
      url: https://sh.rustup.rs
      dest: /tmp/sh.rustup.rs
      mode: '0755'
      force: 'yes'
    tags:
      - rust

  - name: install rust/cargo
    when: cargo_exists is failed
    shell: /tmp/sh.rustup.rs -y
    tags:
      - rust

You can save this as a local.yml and run the following in your shell to run the playbook on your local machine.

ansible-playbook local.yml --ask-become-pass

note: --ask-become-pass is required for the system update step. This will ask for your password as soon as ansible starts.

I also have a very similar article on hwo I ansible install fonts
In looking for a way to automatically generate descriptions for pages I stumbled into a markdown ast in python. It allows me to go over the markdown page and get only paragraph text. This will ignore headings, blockquotes, and code fences.

import commonmark
import frontmatter

post = frontmatter.load("post.md")
parser = commonmark.Parser()
ast = parser.parse(post.content)

paragraphs = ''
for node in ast.walker():
    if node[0].t == "paragraph":
        paragraphs += " "
        paragraphs += node[0].first_child.literal

It’s also super fast, previously I was rendering to html and using beautifulsoup to get only the paragraphs. Using the commonmark ast was about 5x faster on my site.

Duplicate Paragraphs #

When I originally wrote this post, I did not realize at the time that commonmark duplicates nodes. I still do not understand why, but I have had success duplicating them based on the source position of the node with the snippet below.

from itertools import compress

import commonmark
import frontmatter

post = frontmatter.load("post.md")
parser = commonmark.Parser()
ast = parser.parse(post.content)

# find all paragraph nodes
paragraph_nodes = [
    n[0]
    for n in ast.walker()
    if n[0].t == "paragraph" and n[0].first_child.literal is not None
]
# for reasons unknown to me commonmark duplicates nodes, dedupe based on sourcepos
sourcepos = [p.sourcepos for p in paragraph_nodes]
# find first occurence of node based on source position
unique_mask = [sourcepos.index(s) == i for i, s in enumerate(sourcepos)]
# deduplicate paragraph_nodes based on unique source position
unique_paragraph_nodes = list(compress(paragraph_nodes, unique_mask))
paragraphs = " ".join([p.first_child.literal for p in unique_paragraph_nodes])

Creating a minimal config specifically for git commits has made running git commit much more pleasant. It starts up Much faster, and has all of the parts of my config that I use while making a git commit. The one thing that I often use is autocomplete, for things coming from elsewhere in the tmux session. For this cmpe-tmux specifically is super helpful.

The other thing that is engrained into my muscle memory is jj for escape. For that I went agead and added my settings and keymap with no noticable performance hit.

Here is the config that has taken

~/.config/nvim/init-git.vim

source ~/.config/nvim/settings.vim
source ~/.config/nvim/keymap.vim
source ~/.config/nvim/git-plugins.vim
lua require'waylonwalker.cmp'

~/.config/nvim/git-plugins.vim

call plug#begin('~/.local/share/nvim/plugged')

" cmp
Plug 'hrsh7th/nvim-cmp'
Plug 'hrsh7th/cmp-nvim-lsp'
Plug 'hrsh7th/cmp-buffer'
Plug 'hrsh7th/cmp-path'
Plug 'hrsh7th/cmp-calc'
Plug 'andersevenrud/compe-tmux', { 'branch': 'cmp' }


call plug#end()

~/.gitconfig

[core]
    editor = nvim -u ~/.config/nvim/init-git.vim

For an embarassingly long time, til today, I have been wrapping my dict gets with key errors in python. I’m sure I’ve read it in code a bunch of times, but just brushed over why you would use get. That is until I read a bunch of PR’s from my buddy Nic and notice that he never gets things with brackets and always with .get. This turns out so much cleaner to create a default case than try except.

Example #

Lets consider this example for prices of supplies. Here we set a variable of prices as a dictionary of items and thier price.

prices = {'pen': 1.2, 'pencil', 0.3, 'eraser', 2.3}

Except KeyError #

What I would always do is try to get the key, and if it failed on KeyError, I would set the value (paper_price in this case) to a default value.

try:
    paper_price = prices['paper']
except KeyError:
    paper_price = None

.get #

What I noticed Nic does is to use get. This feels just so much cleaner that it’s a one liner and feels much easier to read and understand that if there is no price for paper we set it to None.

paper_price = prices.get('paper', None)

We can just as easily set the default to other values. Let’s consider sales for instance. If there is not a record for the sale of paper, it might be that we sold 0 paper in the given dataset.

paper_sales = sales.get('paper', 0)