Drafts

Draft and unpublished posts

0 posts simple view

This morning I was trying to install a modpack on my minecraft server after getting a zip file, and its quite painful when I unzip everything in the current directory rather than the directory it belongs in.

I had the files on a Windows Machine #

So I’ve been struggling to get mods installed on linux lately and the easiest way to download the entire pack rather than each mod one by one seems to be to use the overwolf application on windows. Once I have the modpack I can start myself a small mod-server by zipping it, putting it in a mod-server directory and running a python http.server

python -m http.server

Downoading on the server #

Then I go back to my server and download the modpack with wget.

wget 10.0.0.171:8000/One%2BBlock%2BServer%2BPack-1.4.zip

Unzip to the minecraft-data directory #

Now I can unzip my mods into the minecraft-data directory.

unzip One+Block+Server+Pack-1.4.zip -d minecraft-data

Running the server with docker #

I run the minecraft server with docker, which is setup to mount the minecraft-data directory.

Running a Minecraft Server in Docker

A bit more on that in the other post, but when I download the whole modpack like this I make these changes to my docker compose. (commented out lines)

version: "3.8"

services:
  mc:
    container_name: walkercraft
    image: itzg/minecraft-server:java8
    environment:
      EULA: "TRUE"
      TYPE: "FORGE"
      VERSION: 1.15.2
      # MODS_FILE: /extras/mods.txt
      # REMOVE_OLD_MODS: "true"
    tty: true
    stdin_open: true
    restart: unless-stopped
    ports:
      - 25565:25565
    volumes:
      - ./minecraft-data:/data
      # - ./mods.txt:/extras/mods.txt:ro

volumes:
  data:

My personal Site build went down last week, and I was unable to publish a new article. This is the process I went through to get it back up and running quickly.

Is it a fluke? #

Classic IT fix, rerun it and see if you get the same error. Everyone is busy and when you have your build go down you are probably busy doing something else. My first step is often to simply click rerun right from GitHub actions. Sometimes this will fix it, and sometimes it doesn’t. It’s an easy fix to run in the meantime you are not focused on fixing it.

Is GitHub having issues? #

Also worth a check to see if GitHub is having a hiccup or not. This error felt pretty obviously not GitHub’s fault, but it’s a good one to check when you run into a weird unexplainable error.

Check github status for any downtime issues with actions.

Build Down #

Alright down to the error message I got. The error is pretty obvious that somewhere I am trying to import a non-existing module from click.

Run markata build --no-pretty
Traceback (most recent call last):
  File "/opt/hostedtoolcache/Python/3.8.12/x64/bin/markata", line 33, in <module>
    sys.exit(load_entry_point('markata==0.1.0', 'console_scripts', 'markata')())
  File "/opt/hostedtoolcache/Python/3.8.12/x64/bin/markata", line 25, in importlib_load_entry_point
    return next(matches).load()
  File "/opt/hostedtoolcache/Python/3.8.12/x64/lib/python3.8/importlib/metadata.py", line 77, in load
    module = import_module(match.group('module'))
  File "/opt/hostedtoolcache/Python/3.8.12/x64/lib/python3.8/importlib/__init__.py", line 127, in import_module
    return _bootstrap._gcd_import(name[level:], package, level)
  File "<frozen importlib._bootstrap>", line 1014, in _gcd_import
  File "<frozen importlib._bootstrap>", line 991, in _find_and_load
  File "<frozen importlib._bootstrap>", line 961, in _find_and_load_unlocked
  File "<frozen importlib._bootstrap>", line 219, in _call_with_frames_removed
  File "<frozen importlib._bootstrap>", line 1014, in _gcd_import
  File "<frozen importlib._bootstrap>", line 991, in _find_and_load
  File "<frozen importlib._bootstrap>", line 975, in _find_and_load_unlocked
  File "<frozen importlib._bootstrap>", line 671, in _load_unlocked
  File "<frozen importlib._bootstrap_external>", line 843, in exec_module
  File "<frozen importlib._bootstrap>", line 219, in _call_with_frames_removed
  File "/opt/hostedtoolcache/Python/3.8.12/x64/lib/python3.8/site-packages/markata/__init__.py", line 25, in <module>
    from markata.cli.plugins import Plugins
  File "/opt/hostedtoolcache/Python/3.8.12/x64/lib/python3.8/site-packages/markata/cli/__init__.py", line 1, in <module>
    from .cli import app, cli, make_layout, run_until_keyboard_interrupt
  File "/opt/hostedtoolcache/Python/3.8.12/x64/lib/python3.8/site-packages/markata/cli/cli.py", line 3, in <module>
    import typer
  File "/opt/hostedtoolcache/Python/3.8.12/x64/lib/python3.8/site-packages/typer/__init__.py", line 12, in <module>
    from click.termui import get_terminal_size as get_terminal_size
ImportError: cannot import name 'get_terminal_size' from 'click.termui' (/opt/hostedtoolcache/Python/3.8.12/x64/lib/python3.8/site-packages/click/termui.py)

Check pypi’s release date of click #

So the latest click was released just a few hours before this build. This feels like we are getting somewhere. Either click did a poor job of issuing deprecation warnings, or I was ignoring them in my build pipeline.

click 8.1.0 release date on pypi

pin it and push #

let’s fix this build now

To get the build up and running today so that we don’t stop the flow of new posts I am going to open my requirements.txt file, and pin under the version that was just built.

click<8.1.0

Since I am still busy doing other things that fixing this, and am pretty confident that things were working before, I am just going to commit this and ship it.

watch ci #

Coming back to actions a few minutes later shows the site is building successfully without the same error as before. New posts will now be flowing to the site with the slightly older version of click.

looking for an issue #

Let’s make sure that the issue is going to be resolved. After not being busy and having time to investigate the issue, I can see that typer is the library making the import to get_terminal_size. Lets checkout its GitHub-repo and make sure someone is working on it.

By the time I go to the package that was having this issue there was already an issue up, and PR waiting approval. I gave the Issue a reaction 👍 to signal that I also care, and appreciate the issue author taking time to submit.

I ran into a PR this week where the author was inheriting what BaseException rather than exception. I made this example to illustrate the unintended side effects that it can have.

Try running these examples in a .py file for yourself and try to kill them with control-c.

You cannot Keybard interrupt #

Since things such as KeyboardInterrupt are created as an exception that inherits from BaseException, if you except BaseException you can no longer KeyboardInterrupt.

from time import sleep

while True:
    try:
        sleep(30)
    except BaseException: # ❌
        pass

except from Exception or higher #

If you except from exception or something than inherits from it you will be better off, and avoid unintended side effects.

from time import sleep

while True:
    try:
        sleep(30)
    except Exception: # ✅
        pass

This goes with Custom Exceptions as well #

When you make custom exceptions expect that users, or your team members will want to catch them and try to handle them if they can. If you inherit from BaseException you will put them in a similar situation when they use your custom Exception.

class MyFancyException(BaseException): # ❌
    ...

class MyFancyException(Exception): # ✅
    ...

When I need a consistent key for a pythohn object I often reach for hashlib.md5 It works for me and the use cases I have.

diskcache #

Yesterday we talked about setting up a persistant cache with python diskcache. In order to make this really work we need a good way to make consistent cache keys from some sort of python object.

How I setup a sqlite cache in python

hash #

does not work

My first thought was to just hash the files, this will give me a unique key for each. This will work, and give you a consistant key for one and only one given python process. If you start a new interpreter you will get different keys.

waylonwalker.com on  main [$✘!?] via  v5.1.5  v3.8.0 (waylonwalker.com)
 ipython

waylonwalker main v3.8.0 ipython
 hash("waylonwalker")
-3862245013515310359

waylonwalker main v3.8.0 ipython
 hash("waylonwalker")
-3862245013515310359

waylonwalker main v3.8.0 ipython
 exit

waylonwalker.com on  main [$✘!?] via  v5.1.5  v3.8.0 (waylonwalker.com)
 ipython


waylonwalker main v3.8.0 ipython
 hash("waylonwalker")
-83673051278873734

here is a snapshot of my terminal proving that you can get the same hash in one session, but it changes when you restart ipython.

hashlib.md5 #

Here is a quick couple ipython sessions showing that md5 cache is consistent accross multiple sessions.

waylonwalker.com on  main [$✘!?] via  v5.1.5  v3.8.0 (waylonwalker.com) on  (us-east-1)
 ipython

waylonwalker main v3.8.0 ipython
 hashlib.md5("waylonwalker")
[PYFLYBY] import hashlib
╭─────────────────────────────── Traceback (most recent call last) ────────────────────────────────╮
 <ipython-input-1-1537c4473c74>:1 in <module>                                                     
╰──────────────────────────────────────────────────────────────────────────────────────────────────╯
TypeError: Unicode-objects must be encoded before hashing

waylonwalker main v3.8.0 ipython
 hashlib.md5("waylonwalker".encode("utf-8"))
<md5 HASH object @ 0x7fe4ba6832d0>

waylonwalker main v3.8.0 ipython
 hashlib.md5("waylonwalker".encode("utf-8")).hexdigest()
'1c7c1073ca096ffdb324471770911fe2'

waylonwalker main v3.8.0 ipython
 hashlib.md5("waylonwalker".encode("utf-8")).hexdigest()
'1c7c1073ca096ffdb324471770911fe2'

waylonwalker main v3.8.0 ipython
 hashlib.md5("waylonwalker".encode("utf-8")).hexdigest()
'1c7c1073ca096ffdb324471770911fe2'

waylonwalker main v3.8.0 ipython
 exit


waylonwalker.com on  main [$✘!?] via  v5.1.5  v3.8.0 (waylonwalker.com) on  (us-east-1) took 47s
 ipython

waylonwalker main v3.8.0 ipython
 hashlib.md5("waylonwalker".encode("utf-8")).hexdigest()
[PYFLYBY] import hashlib
'1c7c1073ca096ffdb324471770911fe2'


key for diskcache #

Since it is consistent we can use it as a cache key for diskcache operations. I setup a little funciton that allows me to pass a bunch of differnt things in to cache. As long as the str method exists and is gives the data that you want to cache key on, this will work.

def make_hash(self, *keys: str) -> str:
    str_keys = [str(key) for key in keys]
    return hashlib.md5("".join(str_keys).encode("utf-8")).hexdigest()

understanding python *args and **kwargs

If the *args is confusing, I have a full article on *args and **kwargs.

See it in action #

Here you can see it in action. Anything passed into the function gets to be part of the key.

waylonwalker ↪main v3.8.0 ipython
❯ def make_hash(self, *keys: str) -> str:
...:     str_keys = [str(key) for key in keys]
...:     return hashlib.md5("".join(str_keys).encode("utf-8")).hexdigest()
...:

waylonwalker ↪main v3.8.0 ipython
❯ make_hash(1, "one", "1", 1.0)
'73901d019df012a1cdab826ce301217d'


waylonwalker ↪main v3.8.0 ipython
❯ exit


waylonwalker.com on  main [$✘!?] via  v5.1.5  v3.8.0 (waylonwalker.com) on  (us-east-1) took 19m19s
❯

waylonwalker.com on  main [$✘!?] via  v5.1.5  v3.8.0 (waylonwalker.com) on  (us-east-1)
❯ ipython

waylonwalker ↪main v3.8.0 ipython
❯ def make_hash(self, *keys: str) -> str:
...:     str_keys = [str(key) for key in keys]
...:     return hashlib.md5("".join(str_keys).encode("utf-8")).hexdigest()
[PYFLYBY] import hashlib

waylonwalker ↪main v3.8.0 ipython
❯ make_hash(1, "one", "1", 1.0)
'73901d019df012a1cdab826ce301217d'

When I need to cache some data between runs or share a cache accross multiple processes my go to library in python is diskcache. It’s built on sqlite with just enough cacheing niceties that make it very worth it.

install diskcache #

Install diskcache into your virtual environement of choice using pip from your command line.

python -m pip install diskcache

setup the cache #

There are a couple of different types of cache, Cache, FanoutCache, and DjangoCache, you can read more about those in the docs

from diskcache import Cache
cache = FanoutCache('.mycache', statistics=True)

Adding to the cache #

Adding to the cache only needs a key and value.

cache.add('me', 'waylonwalker' )

Set the expire time #

Optionally you can set the seconds before it expires. The cache invalidation tools like this is what really makes diskcache shine over using raw sqlite or any sort of static file.

cache.add('me', 'waylonwalker', expire=60)

tagging #

Diskcache supports tagging entries added to the cache.

# add an item to the cache with a tag
cache.add('me', 'waylonwalker', expire=60, tag='people')

This seems to let you do a few new things like getting items from the cache by both key and tag, or evict all tags from the cache.

# evict all items tagged as 'people' from the cache
cache.evict(tag='people')

Reading from the cache #

You can read from the cache by using the .get method and giving it the key you want to retrieve.

who = cache.get('me')
# who == 'waylonwalker'

Cache Misses #

Cache misses will return a None just like any dictionary .get miss.

missed = cache.get('missing')
# missed == None

#

Give Grant some love and give grantjenks/python-diskcache a ⭐.

The easiest way to speed up any code is to run less code. A common technique to reduce the amount of repative work is to implement a cache such that the next time you need the same work done, you don’t need to recompute anything you can simply retrieve it from a cache.

lru_cache #

The easiest and most common to setup in python is a builtin functools.lru_cache.

from functools import lru_cache

@lru_cache
def get_cars():
    print('pulling cars data')
    return pd.read_csv("https://waylonwalker.com/cars.csv", storage_options = {'User-Agent': 'Mozilla/5.0'})

when to use lru_cache #

Any time you have a function where you expect the same results each time a function is called with the same inputs, you can use lru_cache.

when same *args, **kwargs always return the same value

lru_cache only works for one python process. If you are running multiple subprocesses, or running the same script over and over, lru_cache will not work.

lru_cache only caches in a single python process

max_size #

lru_cache can take an optional parameter maxsize to set the size of your cache. By default its set to 128, if you want to store more or less items in your cache you can adjust this value.

The get_cars example is a bit of a unique one. As anthonywritescode points out this implementation is behaving like a singleton, and we can optimize the size of the cache by allocating exactly how many items we will ever have in it by setting its value to 1.

from functools import lru_cache

@lru_cache(maxsize=1)
def get_cars():
    print('pulling cars data')
    return pd.read_csv("https://waylonwalker.com/cars.csv", storage_options = {'User-Agent': 'Mozilla/5.0'})

My example stretches the rule a little bit #

The example above does a web request. As a Data Engineer I often write scripts that run for a short time then stop. I do not expect the output of this function to change during the runtime of this job, and if it did I may actually want them to match anyways.

web request do change their output

If I were building webapps, or some sort of process that was running for a long time. Something that starts and waits for work, this may not be a good application of lru_cache. If this process is running for days or months my assumption that the request does not change is no longer valid.

There’s also a typed kwarg for lru_cache #

This one is new to me but you can cache not only on the value, but the type of the value being passed into your function.

(from the docstring) If typed is True, arguments of different types will be cached separately. For example, f(3.0) and f(3) will be treated as distinct calls with distinct results.

I keep a small cars.csv on my website for quickly trying out different pandas operations. It’s very handy to keep around to help what a method you are unfamiliar with does, or give a teammate an example they can replicate.

Hosts switched #

I recently switched hosting from netlify over to cloudflare. Well cloudflare does some work to block certain requests that it does not think is a real user. One of these checks is to ensure there is a real user agent on the request.

Not my go to dataset 😭 #

This breaks my go to example dataset.

pd.read_csv("https://waylonwalker.com/cars.csv")

# HTTPError: HTTP Error 403: Forbidden

But requests works??? #

What’s weird is, requests still works just fine! Not sure why using urllib the way pandas does breaks the request, but it does.

requests.get("https://waylonwalker.com/cars.csv")

<Response [200]>

Setting the User Agent in pandas.read_csv #

this fixed the issue for me!

After a bit of googling I realize that this is a common thing, and that setting the user-agent fixes it. This is the point I remember seeing in the cloudflare dashbard that they protect against a lot of different attacks, aparantly it treats pd.read_csv as an attack on my cloudflare pages site.

pd.read_csv("https://waylonwalker.com/cars.csv", storage_options = {'User-Agent': 'Mozilla/5.0'})

# success

Now my data is back #

Now this works again, but it feels like just a bit more effort than I want to do by hand. I might need to look into my cloudflare settings to see if I can allow this dataset to be accessed by pd.read_csv.

Python’s requests library is one of the gold standard apis, designed by Kenneth Reitz. It was designed with the user perspective in mind first and implementation second. I have heard this called readme driven development, where the interface the user will use is laid out first, then implemented. This makes the library much mor intuitive than if it were designed around how it was easiest to implement.

Install Requests #

Requests is on pypi and can be installed into your virtual environtment with pip.

python -m pip install requests

Getting the content of a request #

Requests makes getting content from a web url as easy as possible.

import requests

r = requests.get('https://waylonwalker.com/til/htmx-get/')
article = r.content

html">requests is not limited to html #

Requests can handle any web request and is not limited to only html. Here are some examples to get a markdown file, a csv, and a png image.

htmx_get_md = requests.get('https://waylonwalker.com/til/htmx-get.md').content
cars = requests.get('https://waylonwalker.com/cars.csv').content
profile = requests.get('https://waylonwalker.com/8bitc.png').content

RTFM #

There is way more to requests, this just scratches the surface while covering what you are going to need to get going. The requests docs have way more details.

I recently attended python web conf 2022 and after seeing some incredible presentations on it I am excited to give htmx a try.

The base page #

Start with some html boilerplate, pop in a script tag to add the htmx.org script, and a button that says click me. I added just a tish of style so that it does not sear your delicate developer your eyes.

<!DOCTYPE html>
<html lang="en">
  <head>
    <title></title>
    <meta charset="UTF-8">
    <meta name="viewport" content="width=device-width, initial-scale=1">
    <style>
      html  { background: #1f2022; color: #eefbfe; font-size: 64px; }
      button {font-size: 64px;}
      body { height: 100vh; width: 100vw; display: flex; justify-content: center; align-items:center; }
    </style>
    <!-- Load from unpkg -->
    <script src="https://unpkg.com/[email protected]"></script>
  </head>
  <body>
  <!-- have a button POST a click via AJAX -->
  <button hx-get="/partial" hx-swap="outerHTML">
    Click Me
  </button>

  </body>
</html>

Save this as index.html and fire up a webserver and you will be presented with this big beefcake of a button.

big beefcake of a button

If you don’t have a development server preference I reccomend opening the terminal and running python -m http.server 8000 then opening your browser to localhost:8000

The Partial #

Now the page has a button that is ready to replace itself, notice the hx-swap="outerHTML">, with the contents of /partial. To create a static api of sorts we can simply host a partial page in a file at /partial/index.html with the following contents.

<p>
hello
</p>
the final results

Tree #

To make it a bit clearer here is what the file tree looks like after setting this up.

~/git/htmx  v3.9.7 (git)
❯ tree
.
├── clicked
│   └── index.html
└── index.html

Demo #

I added htmx to this page and setup a partial below, check out this easter egg.

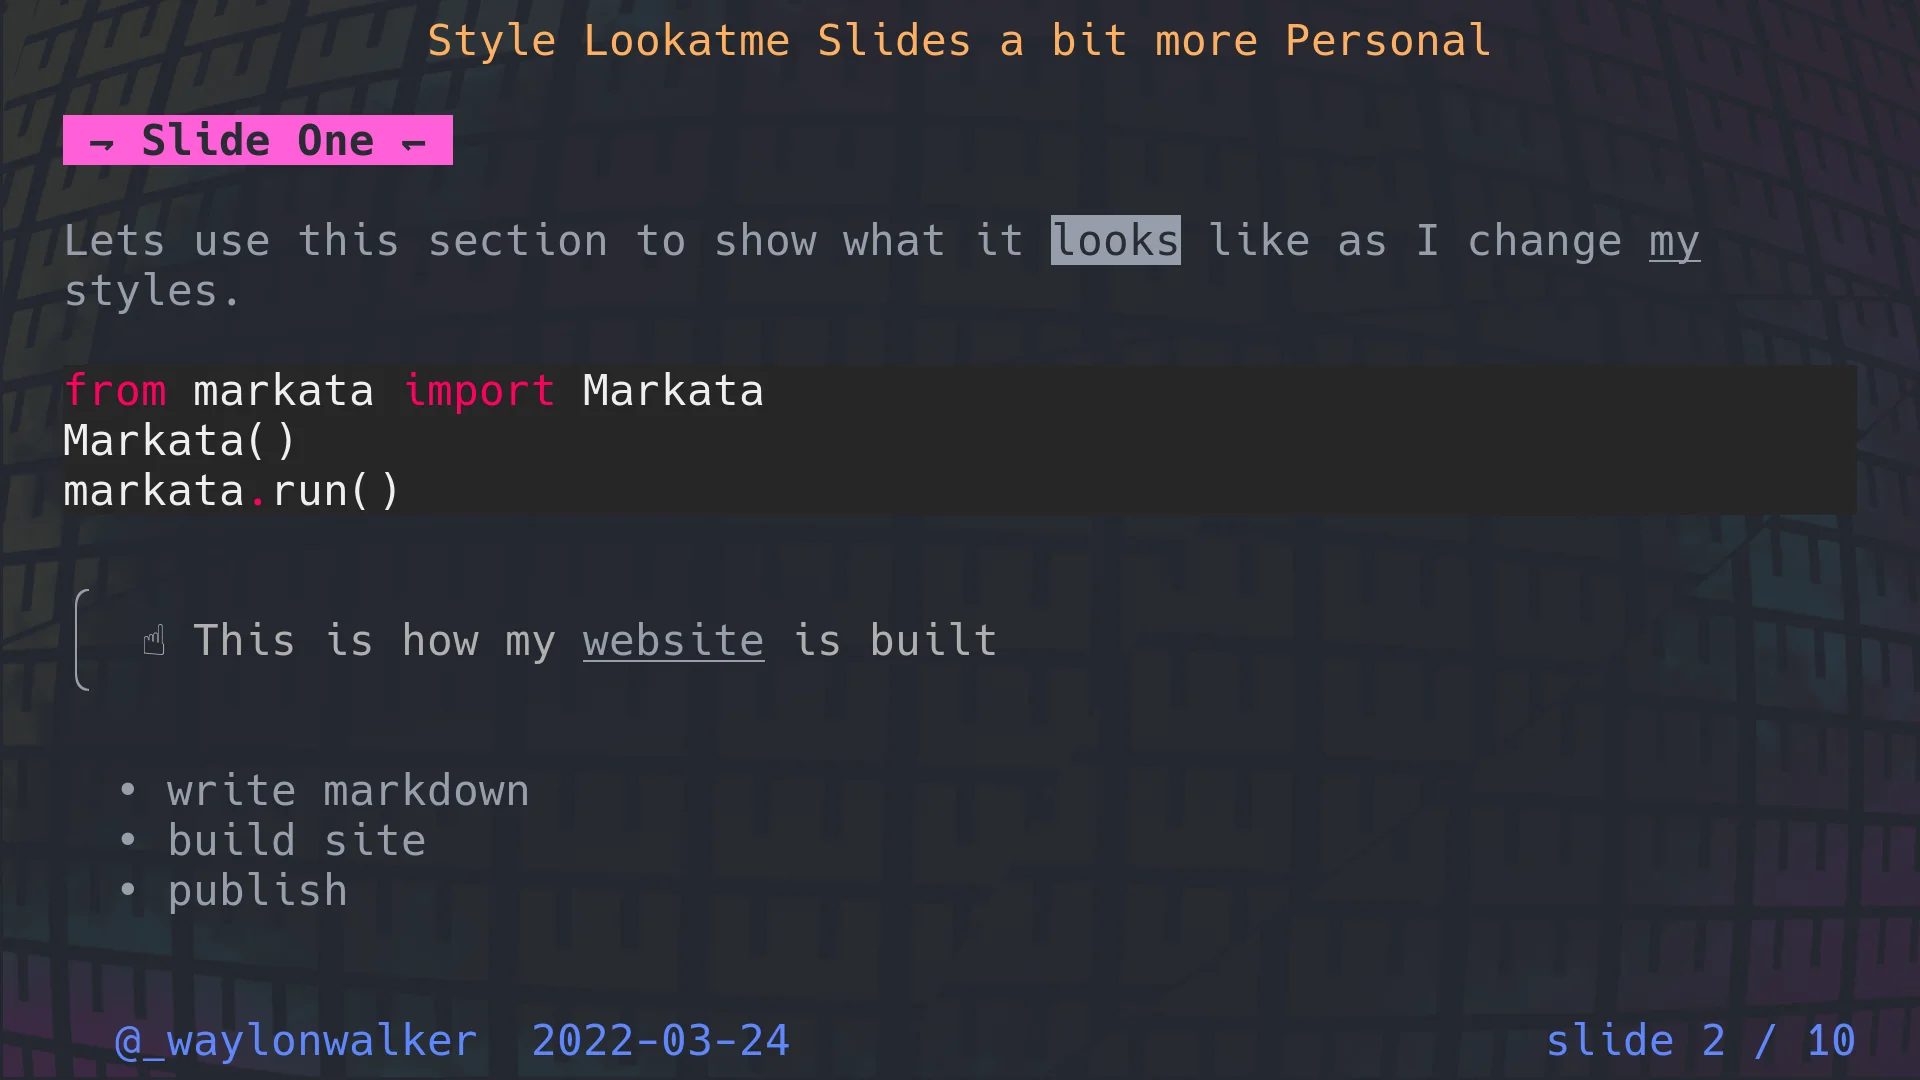
I recently gave a talk at python web conf 2022, and one of the things I did when I should have been working on my presentation was workig on how my presentation looked… classic procrastination technique.

Slide One #

Lets use this section to show what it looks like as I change my styles.

from markata import Markata
Markata()
markata.run()

☝ This is how my website is built

  • write markdown
  • build site
  • publish

default #

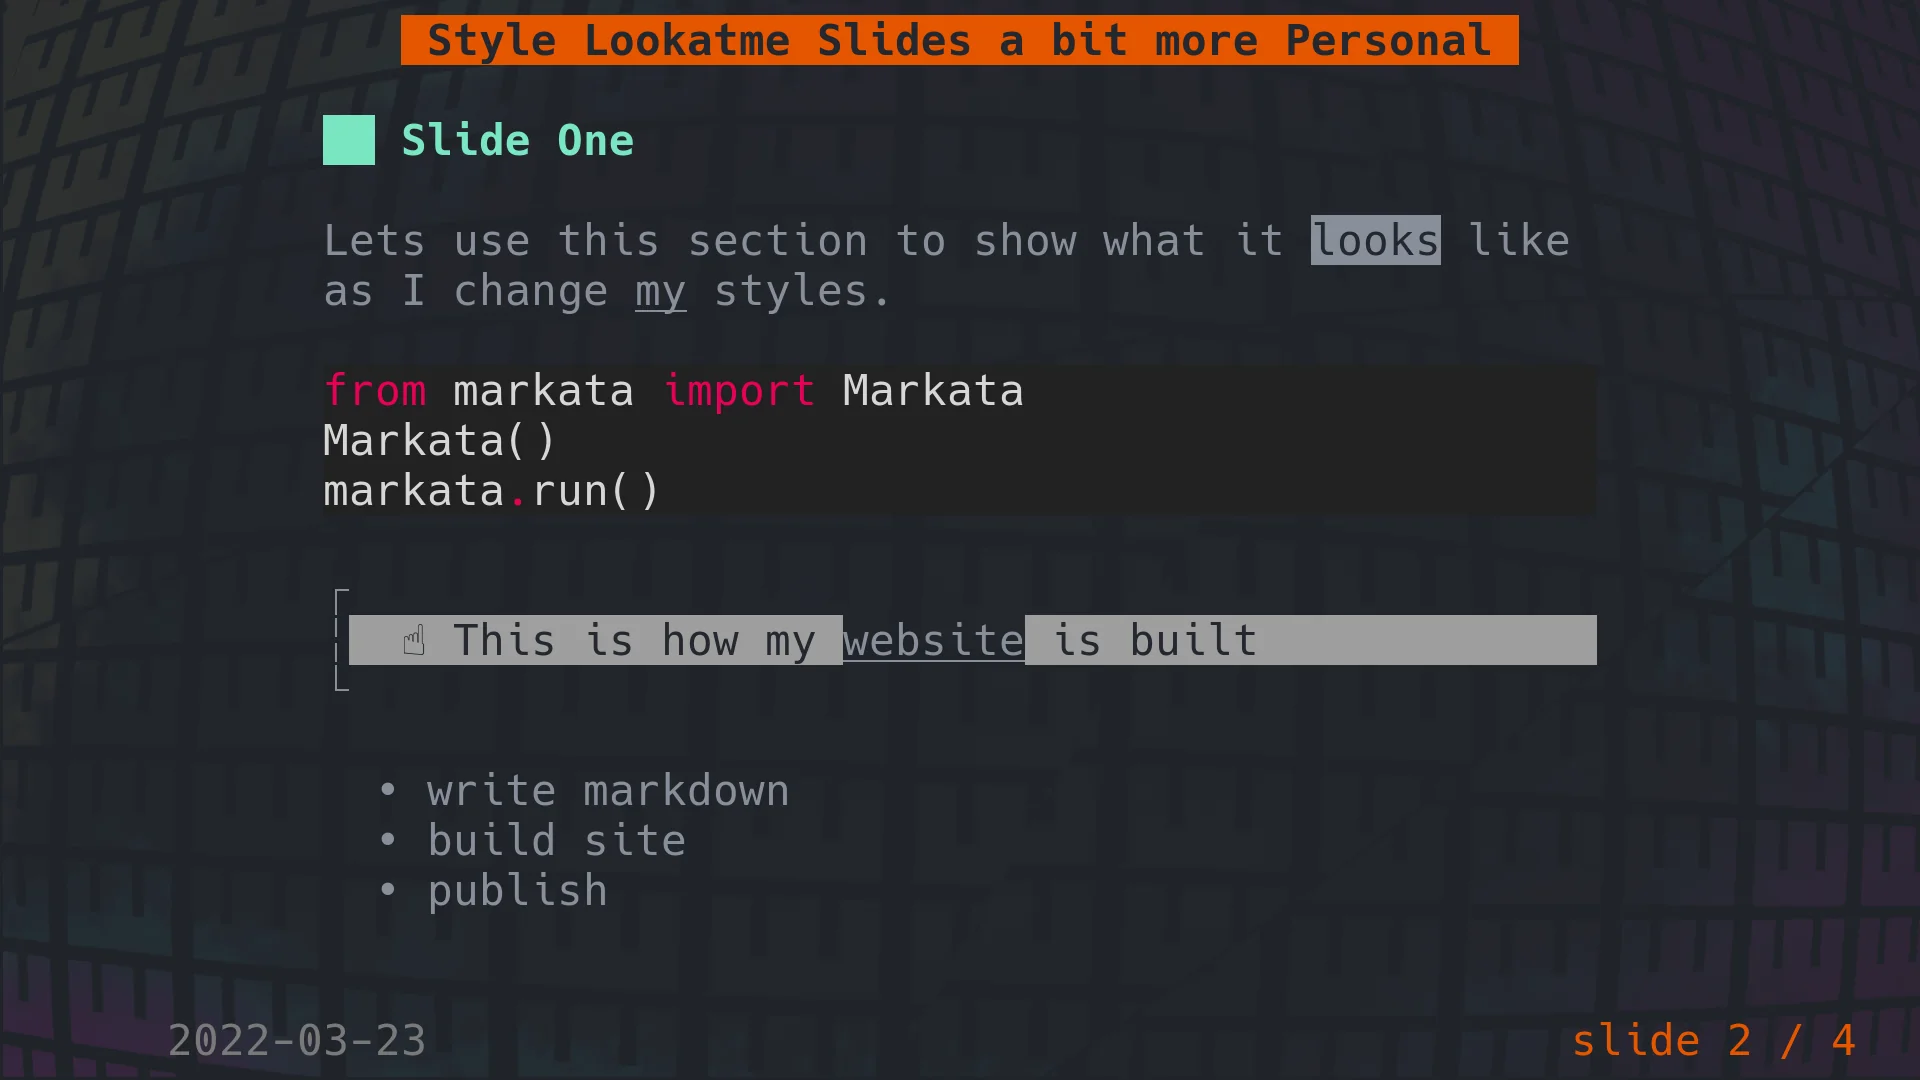
This is what the above slide looks like in lookatme.

default styles

Set focus to the most important element #

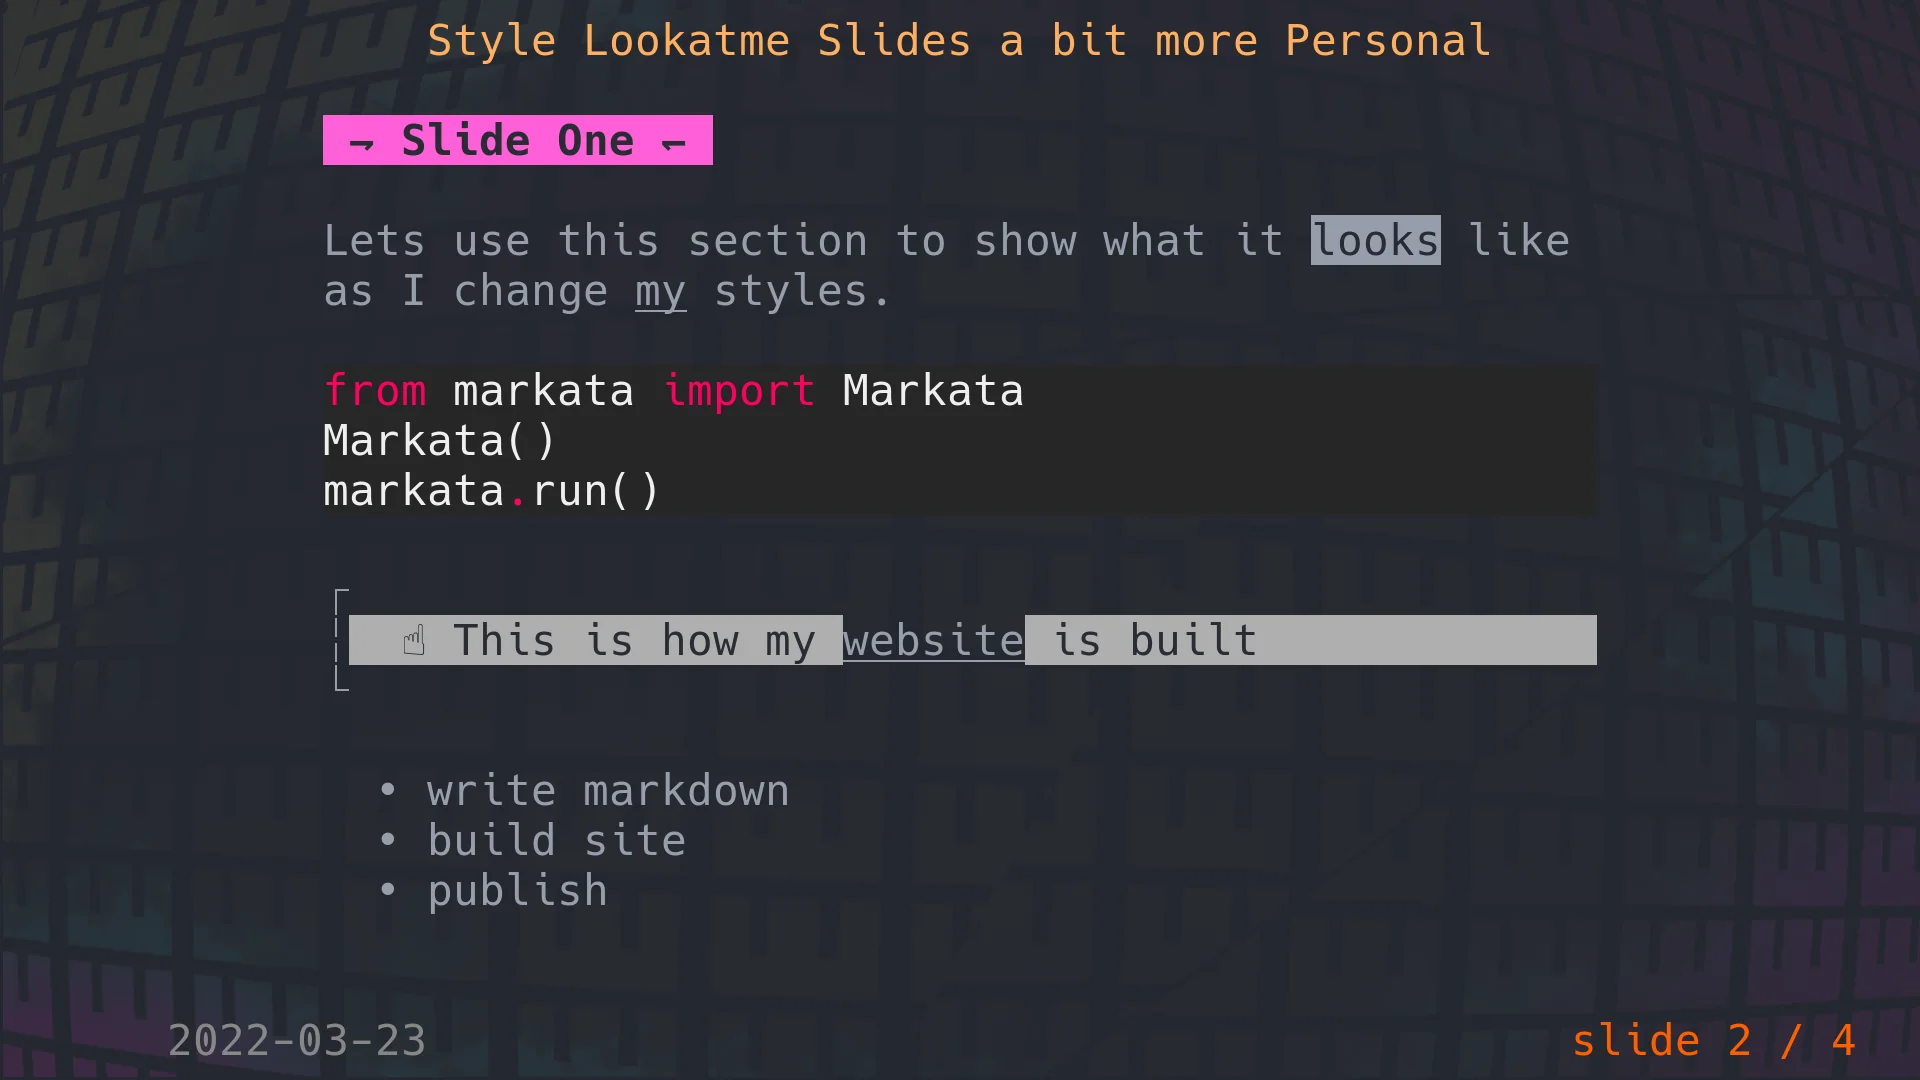
The way I write my slides I want the most prominant element to be the slides title, not the presentation title. The slides title is generally the point I am trying to make, I will leave some supporting information if I want, but sometimes, I just have a title.

styles:
    title:
        bg: default
        fg: '#e1af66'
    headings:
        '1':
            bg: default
            fg: '#ff66c4,bold,italics'
            prefix: ' ⇁ '
            suffix: ' ↽ '
set the focus on the slide title styles

by default he prefix/suffix was a full block that just went transparant into the slide. I thought the harpoons were fun and went with them on a whim

The box characters bother me #

The box characters are fine really, but it really bothers me that they are not conneted. The author is probably doing this because it looks ok on most systems, and many terminals dont have their fonts right and wont align anyways. I am not sure if I ever had a windows terminal other than their new Terminal that properly connected box characters.

    quote:
        side: '│'
        style:
            bg: default
            fg: '#aaa'
        top_corner: '╭'
        bottom_corner: '╰'

Add Author #

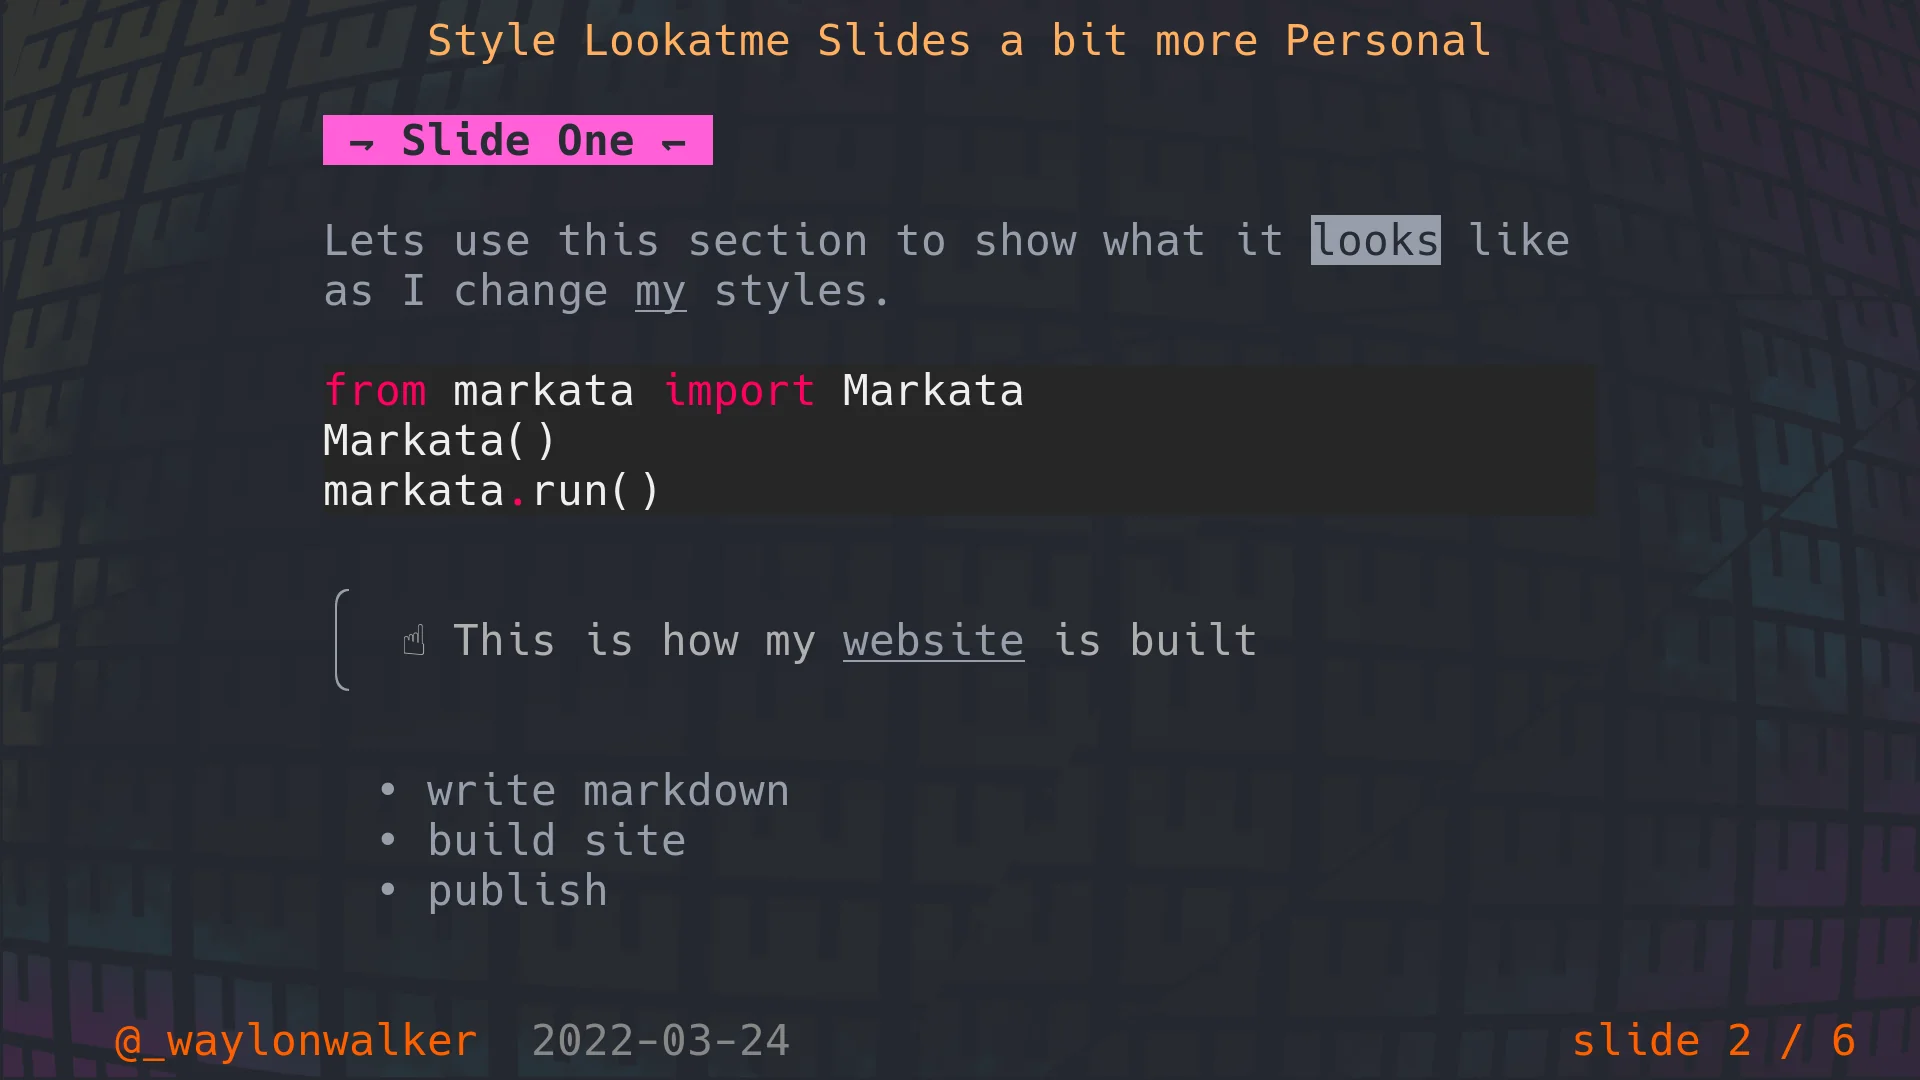
Adding author to the root of the frontmatter of the document will add it to the bottom left of the slides.

author: '@_waylonwalker'
lookatme slides with author defined

Style the author #

We can style the foreground and background of this text by adding something like this to the styles section of the frontmatter.

author:
    bg: default
    fg: '#368ce2'

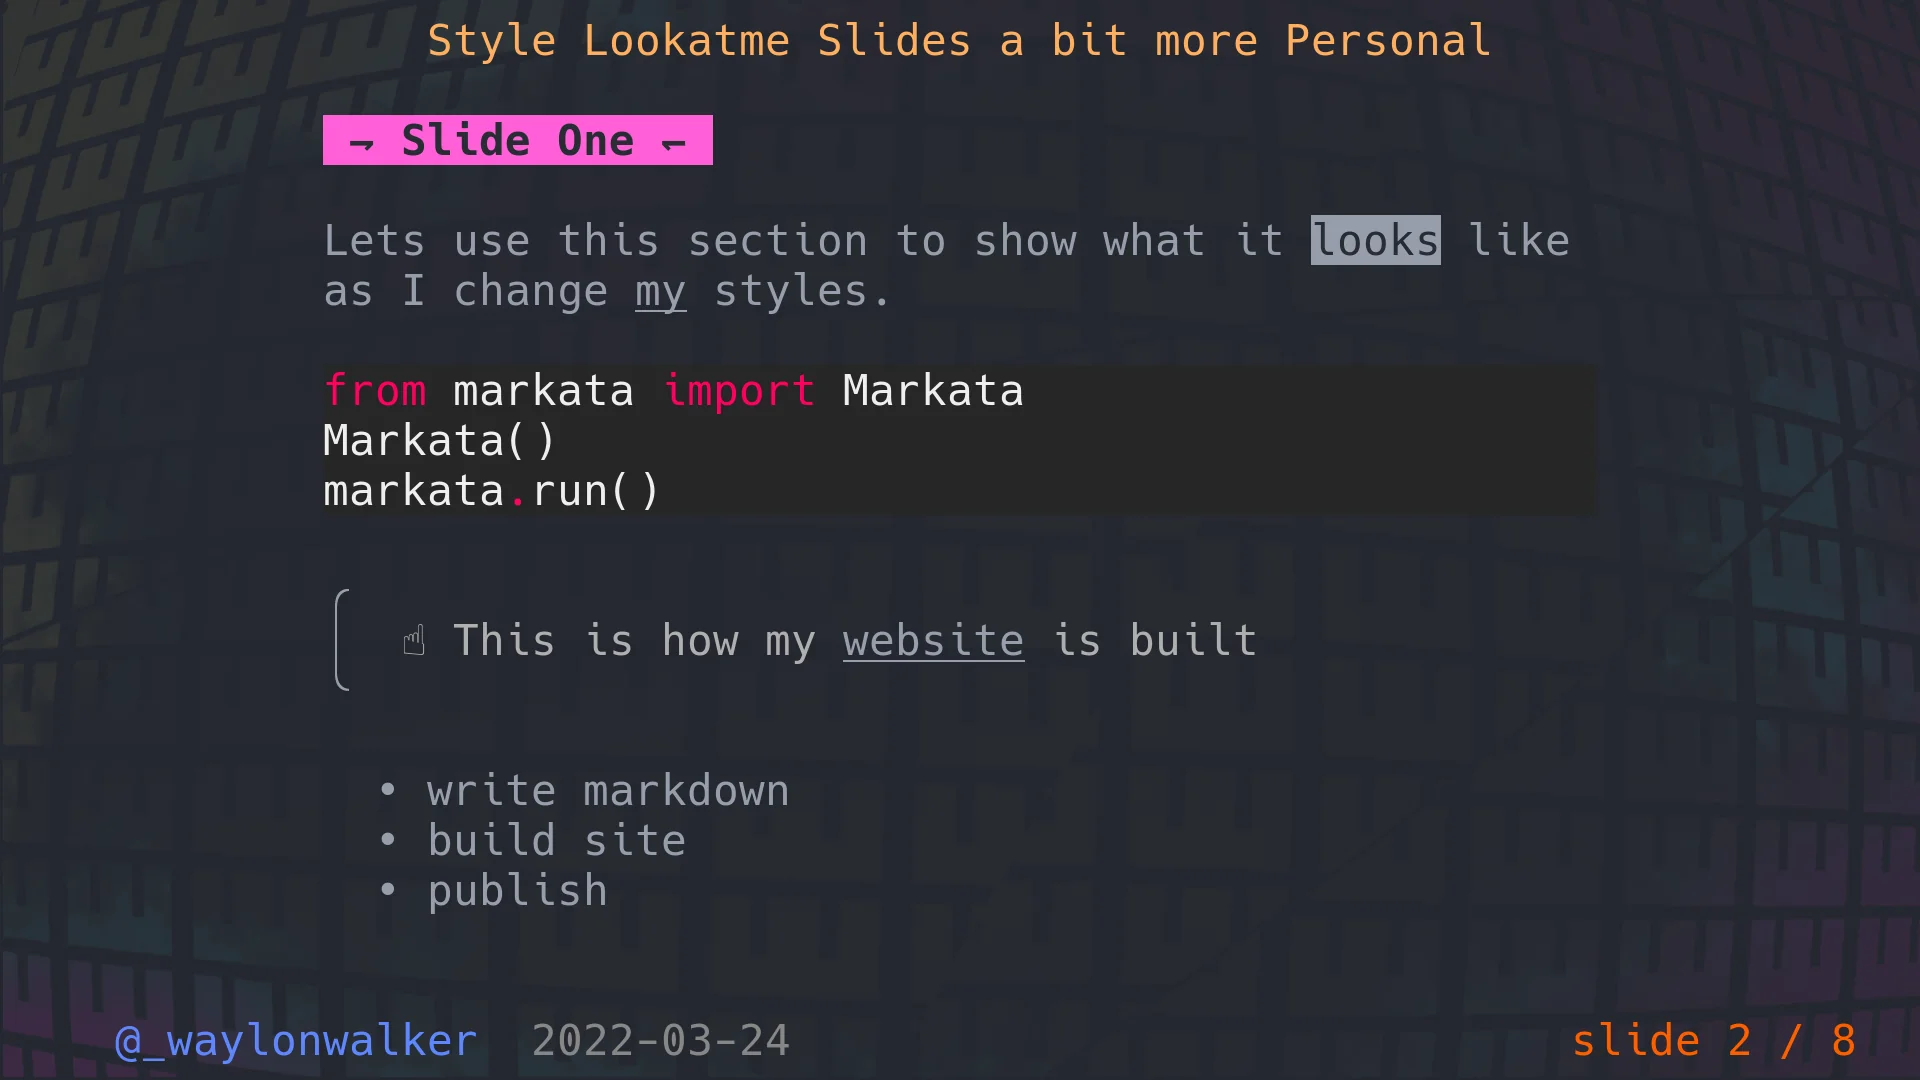
While we are at it, lets style the rest of the footer to my own theme. Let’s pop this into the style and see what it looks like.

date:
    bg: default
    fg: '#368ce2'
slides:
    bg: default
    fg: '#368ce2'
lookatme slides with author styled

reduce the padding #

When I am presenting I am punched in as big as I can go, and which makes the padding massive. I want as much as the screen real estate devoted to making big readable text as I can.

padding:
    bottom: 0
    left: 0
    right: 0
    top: 0
lookatme slides with no more padding

final results #

Here is what the final frontmatter looks like to fully style my talk.

---
date: 2022-03-24
templateKey: til
title: Style Lookatme Slides a bit more Personal
tags:
  - python
  - cli
  - python
author: '@_waylonwalker'
styles:
    padding:
        bottom: 0
        left: 0
        right: 0
        top: 0
    title:
        bg: default
        fg: '#e1af66'
    date:
        bg: default
        fg: '#368ce2'
    slides:
        bg: default
        fg: '#368ce2'
    headings:
        '1':
            bg: default
            fg: '#ff66c4,bold,italics'
            prefix: ' ⇁ '
            suffix: ' ↽ '
    quote:
        side: '│'
        style:
            bg: default
            fg: '#aaa'
        top_corner: '╭'
        bottom_corner: '╰'
    author:
        bg: default
        fg: '#368ce2'
---

I use a package eyeseast/python-frontmatter{.hoverlink} to load files with frontmatter in them. Its a handy package that allows you to load files with structured frontmatter (yaml, json, or toml).

Install #

It’s on pypi, so you can install it into your virtual environment with pip.

python -m pip install python-frontmatter

🙋 What’s Frontmatter #

Frontmatter is a handy way to add metadata to your plain text files. It’s quite common to have yaml frontmatter in markdown. All of my blog posts have yaml frontmatter to give the post metadata such as post date, tags, title, and template. dev.to is a popular developer blogging platform that also builds all of its posts with markdown and yaml frontmatter.

Let’s see an example #

Here is the exact frontmatter for this post you are reading on my site.

---
date: 2022-03-24 03:18:48.631729
templateKey: til
title: How I load Markdown in Python
tags:
  - linux
  - python

---

This is where the markdown content for the post goes.

So it’s yaml #

yaml is the most commmon, but python-frontmatter{.hoverlink} also supports Handlers{.hoverlink} for toml and json.

If you want a good set of examples of yaml learnxinyminutes{.hoverlink} has a fantastic set of examples in one page.

How to load yaml frontmatter in python #

Here is how I would load this post into python using python-frontmatter{.hoverlink}.

import frontmatter
inspect(frontmatter.load("pages/til/python-frontmatter.md"))

We can use rich{.hoverlink} to inspect the Post object to see what all it contains.

 inspect(frontmatter.load("pages/til/python-frontmatter.md"))
╭────────────────────────────────────────────────────────── <class 'frontmatter.Post'> ───────────────────────────────────────────────────────────╮
 A post contains content and metadata from Front Matter. This is what gets                                                                       
 returned by :py:func:`load <frontmatter.load>` and :py:func:`loads <frontmatter.loads>`.                                                        
 Passing this to :py:func:`dump <frontmatter.dump>` or :py:func:`dumps <frontmatter.dumps>`                                                      
 will turn it back into text.                                                                                                                    
                                                                                                                                                 
 ╭─────────────────────────────────────────────────────────────────────────────────────────────────────────────────────────────────────────────╮ 
  <frontmatter.Post object at 0x7f03c4c23ca0>                                                                                                  
 ╰─────────────────────────────────────────────────────────────────────────────────────────────────────────────────────────────────────────────╯ 
                                                                                                                                                 
  content = "I use a package\n[eyeseast/python-frontmatter](https://github.com/eyeseast/python-frontmatter)\nto load files with frontmatter in   │
            them.  Its a handy package that allows you to\nload files with structured frontmatter (yaml, json, or toml).\n\n## Install\n\nIt's   │
            on pypi, so you can install it into your virtual environment with pip.\n\n```bash\npython -m pip install                             
            python-frontmatter\n```\n\n## 🙋 What's Frontmatter\n\nFrontmatter is a handy way to add metadata to your plain text files.          │
            It's\nquite common to have yaml frontmatter in markdown.  All of my blog posts have\nyaml frontmatter to give the post metadata such │
            as post date, tags, title, and\ntemplate.  dev.to is a popular developer blogging platform that also builds all\nof its posts with   
            markdown and yaml frontmatter.\n\n## Let's see an example\n\nHere is the exact frontmatter for this post you are reading on my       │
            site.\n\n```markdown\n---\ndate: 2022-03-24 03:18:48.631729\ntemplateKey: til\ntitle: How I load Markdown in Python\ntags:\n  -      
            linux\n  - python\n\n---\n\nThis is where the markdown content for the post goes.\n```\n\n## So it's yaml\n\nyaml is the most        │
            commmon, but\n[eyeseast/python-frontmatter](https://github.com/eyeseast/python-frontmatter)\nalso                                    
            supports\n[Handlers](https://python-frontmatter.readthedocs.io/en/latest/handlers.html?highlight=toml#module-frontmatter.default_ha… │
            toml and json.\n\nIf you want a good set of examples of yaml\n[learnxinyminutes](https://learnxinyminutes.com/docs/yaml/) has a      
            fantastic set\nof examples in one page.\n\n## How to load yaml frontmatter in python"                                                │
  handler = <frontmatter.default_handlers.YAMLHandler object at 0x7f03bffbd910>                                                                  
 metadata = {                                                                                                                                    
                'date': datetime.datetime(2022, 3, 24, 3, 18, 48, 631729),                                                                       
                'templateKey': 'til',                                                                                                            
                'title': 'How I load Markdown in Python',                                                                                        
                'tags': ['linux', 'python', 'python']                                                                                            
            }                                                                                                                                    
╰─────────────────────────────────────────────────────────────────────────────────────────────────────────────────────────────────────────────────╯

Getting Metadata #

You can get items from the posts metadata just as you would from a dict.

post = frontmatter.load("pages/til/python-frontmatter.md")
post['date']
# datetime.datetime(2022, 3, 24, 3, 18, 48, 631729)

post.get('date')
# datetime.datetime(2022, 3, 24, 3, 18, 48, 631729)

python dict get

I have recently become fond of the .get method to give it an easy default value.

Content is content #

The content of the document is stored under .content

post.content

Today I was watching the python web conf 2022 and saw @davidbujic use the new Dict Union Operator Live on stage during his Functional Programming talk. This operator was first introduced into python 3.9 with pep584.

Merge Dicts #

I’ve long updated dicts through the use of unpacking. Note that the last item always wins. It makes it pretty easy to make user overrides to default configurations. With pep584 landing in python 3.9 we can now leverage the | operator to achieve the same result.

default_config = {'url': 'https://example.com', 'assets_dir': 'static' }
user_config = {'url': 'https://waylonwalker.com'}

# **unpacking goes back much further than 3.9

config = {**default_config, **user_config}
print(config)
# {'url': 'https://waylonwalker.com', 'assets_dir': 'static'}


# the same can be achieved through the new to python 3.9 | operator

config = default_config | user_config
print(config)
# {'url': 'https://waylonwalker.com', 'assets_dir': 'static'}

understanding python *args and **kwargs

More on unpacking in this post.

Update Dicts #

With the release there is also a new update syntax |= that you can use to update. I dont often mutate variables for some reason, so I cant think of a better example for this from my personal use cases. So I will give a similar example to above, except creating a config, then updating it.

# old python <3.9 way
config = {'url': 'https://example.com', 'assets_dir': 'static' }
config.update({'url': 'https://waylonwalker.com'})

# new python 3.9+ way
config = {'url': 'https://example.com', 'assets_dir': 'static' }
config |= {'url': 'https://waylonwalker.com'}

print(config)
# {'url': 'https://waylonwalker.com', 'assets_dir': 'static'}

Should you use it? #

Are you writing libraries/applications that are only going to be ran on 3.9? Then ya go for it there is nothing to loose. If there is any chance someone is going to run your code on 3.8 or older then just use **, or .update.

RTFM #

This is what comes first to my mind on how to use this new syntax, read pep584 for all the gritty details on it.

I love the freedom of writing in markdown. It allows me to write content from the comfort of my editor with very little focus on page style. It turns out that markdown is also a fantastic tool for creating slides.

Present from the terminal #

I will most often just present right from the terminal using lookatme. Presenting from the terminal lets me see the results quick right from where I am editing. It also allows me to pop into other terminal applications quickly.

reveal.js #

I sometimes also use reveal.js, but that’s for another post. It is handy that it lives in the browser and is easier to share.

New Slides #

I leverage auto slides when I write my slides in markdown. The largest heading, usually an h2 for me, becomes the new slide marker. Otherwise my process is not much different, It just becomes a shorter writing style.

Installation #

lookatme is a python library that is available on pypi, you can install it with the pip command.

python -m pip install lookatme

Since it’s a command line application it works great with pipx. This prevents the need to manage virtual environments yourself or ending up with packages clashing in your system python environment.

pipx install lookatme

From my terminal #

lookatme {filepath}

I just run it with pipx.

pipx run \
 --spec git+https://github.com/waylonwalker/lookatme \
 lookatme {filepath} \
 --live-reload \
 --style gruvbox-dark

Note, I use a custom fork of lookatme. It’s schema validation did not like the date format of my blog posts, so I have a one line fix built into my fork that is pretty specific to me.

From Neovim #

most often what I do

From Neovim I use a plugin I created for sending out commands to tmux called telegraph. This sends the above command to a new session that I can bounce between quickly.

nnoremap <leader><leader>s <cmd>lua require'telegraph'.telegraph({cmd='pipx run --spec git+https://github.com/waylonwalker/lookatme lookatme {filepath} --live-reload --style gruvbox-dark', how='tmux'})<CR>

When I need to read contents from a plain text file in python I find the easiest way is to just use Pathlib.

from pathlib import Path

Path('path_to_file').read_text()

Let’s make a vim command to automatically collect all the links in these posts at the end of each article. Regex confuses the heck out of me… I don’t have my regex liscense, but regex can be so darn powerful especially in an editor.

Step one #

Before you run someone’s regex from the internet that you don’t fully understand, check your git status and make sure you are all clear with git before you wreck something

Inspiration #

Something that I have always appreciated form Nick Janetakis is his links section. I often try to gather up the links at the end of my posts, but often end up not doing it or forgetting.

Searchng through the internet I was able to find an article from Vitaly Parnas called vim ref links that did almost exactly what I needed, except it was more complicated and made them into ref liks.

Here is my interpretation of the code I took from Vitaly’s post. It makes a Links section like the one at the bottom of this post.

function! MdLinks()
    $norm o## Links
    $norm o
    g/\[[^\]]\+\]([^)]\+)/t$
    silent! '^,$s/\v[^\[]*(\[[^\]]+\])\(([^)]+)\)[^\[]*/* \1(\2)/g
    nohl
endfunction
command! MdLinks call MdLinks()

So far it is working for me and saving me a few seconds off each post I make.

If you ever end up on a linux machine that just does not have enough ram to suffice what you are doing and you just need to get the job done you can give it some more swap. You can look up reccomendations for how much swap you should have this is more about just trying to get your job done when you are almost there, but running out of memory on the hardware you have.

make the /swap file #

You can put this where you wish, for this example I am going to pop it into /swap

sudo fallocate -l 4G /swap
sudo chmod 600 /swap
sudo mkswap /swap
sudo swapon /swap

make sure that your swap is on #

You can make sure that your swap is working by using the free command, I like using the -h flag to get human readable numbers.

❯ free -h
               total        used        free      shared  buff/cache   available
Mem:            15Gi       5.5Gi       4.9Gi       458Mi       5.2Gi       9.3Gi
Swap:          4.0Gi          0B       4.0Gi

Reclaim memory usage in Jupyter

I also used this trick in this article to give my python process a bit more oompf and get it on home.

A very common task for any script is to look for files on the system. My go to method when globbing for files in python is to use pathlib.

Setup #

I setup a directory to make some examples about globbing. Here is what the directory looks like.

❯ tree .
.
├── content
│   ├── hello.md
│   ├── hello.py
│   ├── me.md
│   └── you.md
├── readme.md
├── README.md
├── READMES.md
└── setup.py

1 directory, 8 files

Pathlib #

Pathlib is a standard library module available in all LTS versions of python at this point.

 from pathlib import Path

Creating a Path instance.

# current working directory
Path()
Path.cwd()

# The users home directory
Path.home()

# Path to a directory by string
Path('/path/to/directory')

# The users ~/.config directory
Path.home() / '.config'

Globbing Examples #

The path object has a glob method that allows you to glob for files with a unix style glob pattern to search for files. Note that it gives you a generator. This is great for many use cases, but for examples its easier to turn them to a list to print them out.

If you need some more detail on what globbing is there is a wikipedia article discussing it. I am just showing how to glob with pathlib.


 Path().glob("**/*.md")
<generator object Path.glob at 0x7fa35adc4f90>

 list(Path().glob("**/*.md"))

[
    PosixPath('readme.md'),
    PosixPath('READMES.md'),
    PosixPath('README.md'),
    PosixPath('content/you.md'),
    PosixPath('content/me.md'),
    PosixPath('content/hello.md')
]

 list(Path().glob("**/*.py"))
[PosixPath('setup.py'), PosixPath('content/hello.py')]

 list(Path().glob("*.md"))
[PosixPath('readme.md'), PosixPath('READMES.md'), PosixPath('README.md')]

 list(Path().glob("*.py"))
[PosixPath('setup.py')]

 list(Path().glob("**/*hello*"))
[PosixPath('content/hello.py'), PosixPath('content/hello.md')]

 list(Path().glob("**/REA?ME.md"))
[PosixPath('README.md')]

Setting up your git pager to your liking can help you navigate diffs and logs much more efficiently. You can set it to whatever pager you like so that your keys feel nice and smooth and your fingers know exactly what to do. You might even gain a few extra features.

Setting the pager #

You can set the pager right from your command line with the following command.

git config --global core.pager 'more'

You can also set your pager by editing your global .gitconfig file which by default is set to ~/.gitconfig.

[core]
    pager = more

Color #

In my experience you need to turn colors off with nvim. bat handles them and looks good either way, but nvim will be plain white and display the color codes as plain text if color is on.

git config --global color.pager no

Pagers I have tried #

Here are some various configs that I tried. For some reason line numbers in bat really bothered me, but when in nvim they felt ok. I am going to try running both of them for a few days and see which I like better. I think having some of my nvim config could be really handy for things like yanking a commit hash to the system clipboard without touching the mouse.

# bat
git config --global core.pager 'bat'

# nvim in read only mode
git config --global core.pager 'nvim -R'

# turn colors off
git config --global color.pager no

# bat with no line numbers
git config --global core.pager 'bat --style=plain'

# nvim with no line numbers and a specific rc file
git config --global core.pager "nvim -R +'set nonumber norelativenumber' -u ~/.config/nvim/init-git.vim"

reset back to the default #

If you are afraid to try one of these settings, don’t be you can always change it back. If you tried one and dont like it just --unset the config that you just tried.

git config --global --unset core.pager
git config --global --unset color.pager

The other option you have is to open your .gitconfig file and delete the lines of config that set your pager.

If you have ever mistyped a git command very close to an existing one you have likely seen this message.

❯ git chekout dev
git: 'chekout' is not a git command. See 'git --help'.

The most similar command is
        checkout

Automatically run the right one #

What you might not have known is that you can configure git to just run this command for you.

# Gives you 0.1 seconds to respond
git config --global help.autocorrect 1

# Gives you 1 seconds to respond
git config --global help.autocorrect 10

# Gives you 5 seconds to respond
git config --global help.autocorrect 50

Fat Fingers Gone #

Now when you typo a git command it will autmatically run after the configured number of tenths of a second.

❯ git chkout get-error
WARNING: You called a Git command named 'chkout', which does not exist.
Continuing in 1.0 seconds, assuming that you meant 'checkout'.
M       pages/blog/how-i-deploy-2021.md
M       pages/hot_tips/001.md
M       pages/templates/gratitude_card.html
M       plugins/index.py
M       plugins/publish_amp.py
M       plugins/render_template_variables.py
M       plugins/youtube.py
M       requirements.txt
M       static/index.html
Switched to branch 'get-error'

My config #

I’m rocking 10 for now just to see how I feel about it, but honestly I cannot think of a time that I have seen the original warning that was not what I wanted. This at least gives me some time to respond if I am unsure.

git config --global help.autocorrect 10

yq is a command line utility for parsing and querying yaml, like jq does for json.

This is for me #

I love that all of these modern tools built in go and rust, just give you a zipped up executable right from GitHub releases, but it’s not necessarily straight forward how to install them. yq does one of the best jobs I have seen, giving you instructions on how to get a specific version and install it.

I use a bunch of these tools, and for what its worth I trust the devs behind them to make sure they don’t break. This so far has worked out well for me, but if it ever doesn’t I can always pick an older version.

Just give me the latest #

Since I am all trusting of them I just want the latest version. I do not want to update a shell script with new versions, or even care about what then next version is, I just want it. Luckily you can script the release page for the latest version on all that I have came accross.

What is the latest #

I wrote or stole, I think I wrote it, this line of bash quite awhile ago, and it has served me well for finding the latest release for any GitHub project using releases. Just update it with the name of the tool, org, and repo and it works.

YQ_VERSION=$(curl --silent https://github.com/mikefarah/yq/releases/latest | tr -d '"' | sed 's/^.*tag\///g' | sed 's/>.*$//g' | sed 's/^v//')

Install with your shell #

Now that we know how to consistently get the right version, I generally right click the release in the releases page, replace the version with ${TOOL_VERSION} and put it in this wget call, then move the binary over to ~/.local/bin

local tmp=`mktemp -dt install-XXXXXX`
pushd $tmp
YQ_VERSION=$(curl --silent https://github.com/mikefarah/yq/releases/latest | tr -d '"' | sed 's/^.*tag\///g' | sed 's/>.*$//g' | sed 's/^v//')
wget https://github.com/mikefarah/yq/releases/download/v${YQ_VERSION}/yq_linux_amd64.tar.gz -O- -q | tar -zxf - -C /tmp
cp yq_linux_amd64 ~/.local/bin/yq
popd

Install with ansible #

Now I don’t want to worry about missing yq again, so I am added it to my ansible install script. This way it’s installed everyt time I setup a new system with all of my favorite cli’s.

- name: check is yq installed
  shell: command -v yq
  register: yq_exists
  ignore_errors: yes
  tags:
    - yq

- name: Install yq
  when: yq_exists is failed
  shell: |
    local tmp=`mktemp -dt install-XXXXXX`
    pushd $tmp
    YQ_VERSION=$(curl --silent https://github.com/mikefarah/yq/releases/latest | tr -d '"' | sed 's/^.*tag\///g' | sed 's/>.*$//g' | sed 's/^v//')
    wget https://github.com/mikefarah/yq/releases/download/v${YQ_VERSION}/yq_linux_amd64.tar.gz -O- -q | tar -zxf - -C /tmp
    cp yq_linux_amd64 {{ lookup('env', 'HOME') }}/.local/bin/yq
    popd
  tags:
    - yq

This is how I installed it, of course you can always follow Mike’s instructions from the repo.